Can you believe it? A whole weekend gone and not a moment spent on the Trike.
Ive spent the most of the weekend working - I guess it has to happen sometimes - and im commited to preparing the site for my soon to arrive garden office. So Im not complaining, but i did feel a little gloomy when i went into the garage for a spanner to tighten my branch loppers, and i saw my creation patiently waiting for a little more love.... Actually it was the smell of the thing that made me yearn - i love the smell of grubby oil.
Despite not having done anything on my Trike thins weekend I have actually seen two other Trikes. The first was whistling along the road as i was about to pull out of a junction. Much to the anoyance of the driver behind me, I hung on until the trike drove past...... It looked rubbish (too square, too high, too utilitarian - based on a motor bike engine)
The second one was on TV - its the one that Billy Connolly rides on his tour of New Zealand. Lots of people have told me about this programme, but ive not seen it before. The Trike looks nice and clean, but but Im not convinced about proportions and shape - once again its motorcycle based....... The one thing I am most certainly impressed with though is the driving through New Zealand.... Oh my gosh, how great would that be to have all that space and sun and freedom.
Hmmmm, I wonder how much it would cost to ship the Trike out to NZ for a holiday of a lifetime? :-)
Monday, January 29, 2007
Sunday, January 21, 2007
“Sacrificing the night for the good of the Trike”
 Always thinking, always thinking. Ive recently had the following email conversation with TVOR…….
TVOR - I was in bed this morning thinking about your project (I'm not loosing sleep you understand) and a couple of points came to mind.
TVOR - Why can't you re direct your carb, either forwards or backwards, if you go for the adaptor tube? It struck me that it would be a simple matter to weld two flange plates to the end of piece of tube (straight or bent) thus enabling you to direct the carb where you wanted. Remember that the float needs to be horizontal. On the TF the flat chamber is adjustable relative to the carb choke centre line. The looking forward position would give you more space for the filter but may destroy the line of the tank.
ME - I wondered about alternate positioning of carb….. and remembered your water hose fabrication for the TF which inspire the thought that maybe we could recreate a carb one too. Do you think there would be any detrimental effects to the running of the engine by making the pipe longer and potentially more contorted?
TVOR - Have you considered what is going to happen to the hand brake cables? I guess that you don't want to see them but this may difficult because of the angle they exit the brake backplates. I would expect the best you can hope for is that they run parallel to the rear axle attachment tubes. The Austin 1100 (we had one) had a problem because of the low floor and everything having to pass along the centre tunnel. They overcame the problem be the cable coming out of the backplate, running forward almost parallel to the side of the car for a short distance, then passing round a "bell crank" that took the cable across to the centre of the car (can't quite remember what happened here). I do remember that the crank bearing was in line with the water from the wheel and would cease up regularly making the handbrake useless. Once you knew it, it was OK so it could be a possible solution. Even better would be to run the covered cable as close to the backplate as possible terminating it on a bracket off the rearaxle loction tube.
ME - The vehicle was originally fitted with cables that pull round to a simple lever in the tunnel…. And ive seen conversions that use solid bars across the rear axle (thus keeping it neat and tidy) to a crank through to a lever (though im not sure exactly how that links - CHECK OUT THE SOLUTION IN THE PICTURE SHOWN HERE) of course we should also keep an open mind as to where we mount the handbrake lever… im sure it has to be within driver reach, but this driver will be able to reach anywhere around the rear axle – might even be able to get away with it mounted almost right on one of the brake drum backplates! ;-)
I will be getting some SVA / MOT guidelines shortly
BTW it appears a simple decision / conversion as to which side of the bell housing that you take the clutch lever out. – the shaft goes all the way through the bell housing.
With a little help from my freinds
We had some visitors over the weekend and some of them are starting to express an intrest in the Trike (I havent told many people about what im doing - 1) telling people doesnt do anything to add to my fulfillment, and 2) I wouldnt want anyone who might be associated with my day job to think i was spending my "working from home" days playing in the garage - which i must make absolutely clear here - I DONT)
Anyway, When SC popped into the garage to see it for the first time, he asked wether there would be a passenger seat. I quickly explained that I would fit one especially for him so that we could go to the pub on it one day. "No need" he said, he would stand on the rear axle and hold onto my shoulders like kids do on the back of BMX bikes! what a great idea I thought :-)
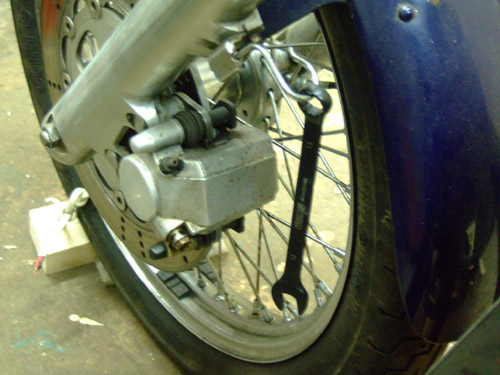
And then later in the day when AM came to dinner, she was keen to have a look at the project. I was impressed with her depth of interest in the details; "Whats that hook thing for" she asked pointing at the break pipe guide on the front forks. Before i had a chance to explain, she was quick to point out that it would be the perfect place to hang my Black Spaner! Brilliant!
Frame Design
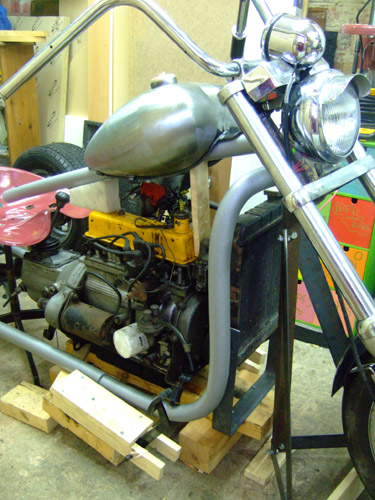
Now before the debate starts, Im not suggesting that this IS the shape. There are plenty of shapes and flow lines and structural bracing to play with yet, but i thought id share my latest bit of fun. This is like doodling with pipe-cleaners. Its brilliant.
Ive been doing all sorts of sketches on paper (usually during dull meetings at work) and whilst im liking the general shapes im coming out with, I know that my proprtions are all wrong when im sketching - I tend to make the whole vehicle shorter and the forks alot longer than they actually are) Also, trying to sketch compound curves is never going to be easy. And so by using some 10mm microbore copper pipe and some foam 15mm pipe insulation tubes, I now have a full sized modeling kit.
My general thinking so far is that i dont want any framework forward of the rad - that will only spoil the space between mechanicals and forks/wheel. I think this is the space that defines "chopper". I also realise now that i am going to have to compromise on some thoughts if i want to produce a symetrical frame. Unless i am prepared to reposition for example the alternator, I cant have the sort of swoop that id imagined. So lots of thinking and playing to be done
Ive only just got the material tonight, and cobbled together what you see in the picture in about 15 minutes. Its a shame that ive now got to go away on business for 4 days as i really want to get on and do some designing. And this makes me think, If i won the lottery my approach wouldn't be any different - I'd still be striving to do it for a grand - but i would give up work instantly and spend hour after hour, day after day in total bliss tinkering away in my garage :-)
Finally.... what do you think to the idea of 2" dia tubing for the frame (lets not get into the discussion about tube or square again ;-) - i rather like the look of this Phat tube... kind of fits with the general feel
Saturday, January 20, 2007
Peddle Design Thoughts
I think im going to have to shorten the peddles so that i can raise them from the tarmac, and if i work the angle so that i can close the triangle (ie put the peddle pivot point closer to the pivot of my foot) I might have a basic design that could work
Couple of things to consider 1) Shorter peddles will mean less leverage, and consequently require greater pushing effort - remember no brake servo or hydraulic clutch luxuries here! and 2) I think (ive been trying this out in my car) that a considerable amount of driver movement when operating brakes and clutches is not necessarily in ankle pivot, but more in leg movement.
Ive got some measurements and calculations to do to wokr out the required movement to disengage clutch and apply proper breaking
Another point i notice i will have to include is somewhere to rest my feet while they arent doing anything. And ideally i wouldnt have running boards - i'd prefer bike pegs, but i cant for the life of me work out how bikers actually keep their feet on them. maybe I will have to have a sit on Hughies bike and get a sense of what happens naturally.
Peddle Positions

Ive been playing with the peddles. I know theyve got to be down by my feet somewhere, but defining the specific position is actually quite a bit harder than i thought it might be. The position is effected by so many factors eg, rake of forks effects position of handle bars which effect riders stance, Likewise the position of the seat which is lead by the position of the gearstick. I'd quite like the positioning to be comfortable.... and then of course theres the bit about making it just look right.
Just to be clear (some people have asked questions to which i thought the answer was obvious) - the throttle will be in my right hand, and the brake and clutch on my right and left foot respectively - as in a regular car operation
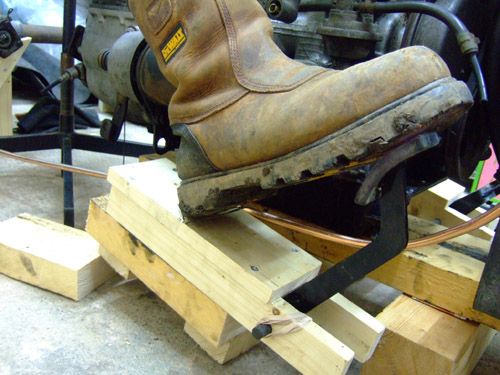
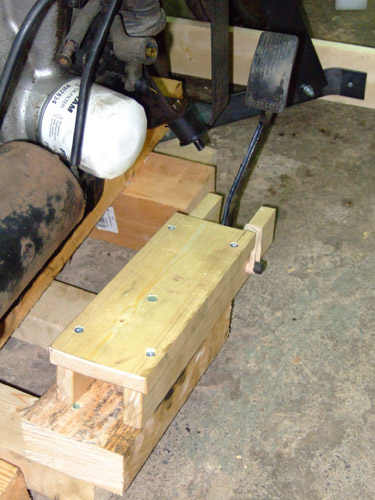
I want to try and use as much as possible of the original car (keeps budget low and it adds to the challenge) and so i rigged up some wooden blocks to hold the original peddles in a working position. I did breifly look at having the peddles hanging as they were orientated in the original car, but this I think looks really messy. And so I am playing with the peddles poking upward (ie the pivot is below the peddle pad)
My current challenge is that by the time ive got my legs and feet in a comfy ride position, the peddles (particularly the clevis pin cranks) are way too low. Can you imagine - I'd get automatic breaking every time i drove over a sleeping policeman hump...... Now theres an idea!
So it looks like i will have to do some rework on the peddles to meet all my needs. I guess the question is, do i rework the original bits, or do i source an alternative or even make my own peddles and mechanisms from scratch
Sunday, January 14, 2007
What to do with the carb
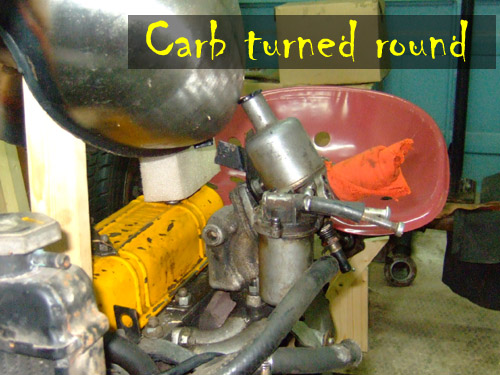
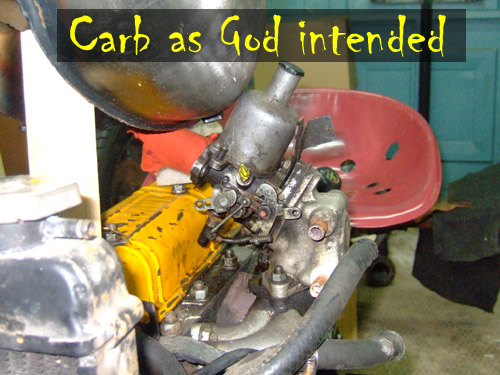
Ive been messing with the position of the carb - partly because i hate all that water hose tangle and that heat exchange block is so unsightly and i wonder if i can do away with it all together, but also because ive got a clearance issue between the top of the damper pot and the fuel tank. And then of course theres always the bit about trying to make it all look lovely
I like the idea of the carb jutting awkwardly (beauty is not always about symetry and tidyness)out of the side of the vehicle with a ridiculously large airfilter - though i am still playing with thoughts on how i might use the original filter holder which i think looks quite cool
Ive tried it round the other way (and taken off the wanky alluminium fuel drip tray thing that stops leaking fuel from dripping directly on the manifold, prefering to redirect it to the back of the engine onto the gearbox bell housing - What a strange thing to build into an engine design - something to account for a leaking carb?)
Eric (the chassis) suggested when he was here, twisting it horizontal - apparently Morris oxfords (or was it Humbers or Austins - he spoke about them all) used to run thier SUs horizontally which if you were happy with continually topping up the damper oil, was supposedly perfectly adequate
Eric also thinks that I wouldnt miss the heat exchanger unit other than for a bit of fuel ecconomy
Perhaps the answer might be for me to construct my own 90 degree adapter which would give me most clearance from the fuel tank and a jaunty jut from the engine. And i'd better use some extra thick gasket seal to ensure there no leaks onto the now exposed exhaust manifold
Poncing about leads to important decisions


Sometimes I can lose myself in my own thoughts and today I lost all track of time from between breakfast and evening dinner. I spent the whole day in the garage, and when i look at the result of all that time, I'm not really sure what i was doing all that time.
My objective was to get a better feel for general layout of the parts so that i might start to do some measurements and detailed drawing. There were times in the day when i felt a little frustraited as all i seemed to be doing was just poncing around trying, say, the tank at a slightly different angle or shifting the front-end back and forth by an inch, trying the the seat at this hieght then that height - all poncing about....... and every now and then I had to pinch myself to remember that actually THIS is the part of projects that I enjoy most (the conceptual stuff and roughing out ideas). I was doing the bit that I love doing and I didnt even recognise it!
I followed through on a decision that I had made in bed a couple of nights ago to create a better frame that would support the front end AND allow me to steer it so i could get a sense for 1) the clearance on the fuel tank and 2) the reach for me as rider as I go round corners - those left-hand turns with racing gear changes are going to be scary - the whole of the vehicles destination and destiny will be not in the palm of my hand but at the very tips of my fingers!
As i was building the support frame i realised that my design for it wasnt the best - I wished i'd thought through some alternatives before starting - and so my predicament was then to choose between continuing with a poor design or start over with a better design...... I chose the former but made a mental note not to get caught in this position again half way through building the frame for real.
The outcome of my efforts for the day are mainly decisions (but I guess making decisons are probably the most important feature of making progress). A couple of important decisions ...
1. Fuel tank needs to be right forward - this creates a good look of all the engine bits piled up front and provides best clearance for the carb and with ....
2. the seat right low, a great clean and sparce back end, which means......
3. a strong simply triangulated rear frame assembly. TVOR and I have been talking about the possibility of a frame that splits into a forward frame and a rear subframe..... could look something like the above sketch
Thursday, January 11, 2007
New advisor joins the project board
Ive just had a phone call from someone who i havent spoken to for years (we send a letter now and then, but i bet the last time we saw each other was at my sisters wedding 17 years ago) and what a coincidence that Ken should call tonight on the night that Eric had been. If Eric is a fountain of interesting knowledge, then Ken is a Geyser of knowledge (though he is anything but a geezer). Ken must be in his late 70's now and i have fond memories as a kid going out in the canoe or boat that he had hand built, or when he would turn up on a sunday afternoon on his beautifully restored Royal Enfield. His Marlin project has been being fettled to perfection for at least 15 years as far as I know. Ken knows about everything and he is of an era when men built "specials" not "customs"
He phoned me to thank me for a couple of photos I'd sent him of the Reliant when we were stripping the donor car (I knew he'd be interested) - and despite not having chatted for many years he was imeadiately into deep conversation about chassis design, torsional stiffness and BHP.
Ken was very quick to suggest (almost as if it was clearly obvious) that i should be building the Trike frame out of box section (ie not tube) - What is going on? Everyone keeps saying "box section" - is it me? am I missing something here?
But Ken did also go on to explain why he thought box section is the sensible option to take. It wasn't so much the explanation of the torsional advantages of box section that interested me, but rather more the practicalities of squareness that until now I had never considered, and Kens reasoning was a real wake up for me. "The thing with tube" says ken "is that everytime you want to mount something to it, youve got to square off the tube" theres no simply bolting a bracket or plate to a tube, youve got to weld a pad on that you can then mount to. And of course when it comes to welding a box section frame, a simple straight sawn end is a perfectly adequate butt welding joint, whereas with tube youve got to file and fillet the butt joint.
Perhaps it is cool to be square..... Hmm MORE thinking to keep me tossing and turning at night.
As we concluded our chat, Ken offered his services as an advisor or a sounding board, and i was particularly intrested in his suggestion that he might be able to bring some new perspectives if I was to ask him "what did they USED to do about........ " A wealth of experience and insights that could provide my own project with some unique features, details and work-around tricks
And so I hereby welcome Ken as an honoury member and advisor to the Black Spanner project board
Reliants open your World to interesting people
Eric came tonight to collect the chassis. He'd done a 2.5 hr drive down from somewhere up north to pick up his £5 chassis - and he seemed very pleased with it. I was very pleased to get it out of my way. While he was here he also bought a couple of the other bits that were cluttering up my space - 2 wheels (I threw the 3rd in for free), the towbar, and the fuel tank for the grand total of £35. bargain and a jolly good clear out to boot.
Eric was an interesting chap. As soon as i opened the garage door he imeadiately identifed the seat on the project as a Fergy T20 - how cool is that?! turns out that he has a couple of tractors And 4 or 5 reliants (Robin, Rialto, Regal) - and he was also talking about engines for Seirras, new sheds and fishing clothing among many of our other conversations.
Eric also had a couple of interesting ideas about the Trike (though I did wonder if we were losing the plot a bit when he suggested that the frame on the trike needed to be nice and curvey so that i didnt do too much damage to anyone who might step out in front of me while i was riding it!!)
He seems to think that the carbureter off a Ford Fiesta MkI fits the reliant engine which might give me better clearance below the tank and better engine performance
He also thinks that the gearbox off a Relaint Regal is longer than my own box which could possibly give me the opportunity to replace the propshaft with a rubber doughnut and bring the rear axle froward (as i would like to do) by a couple of inches - he says he will measure his own regal gearbox and send me the dimensions
I liked Eric and I do hope that his cat gets better soon
Budget update. £583 (as of last count) + £22 (engine mounts) + £39 (seat) - £35 (parts to Eric, chassis, fuel tank, towbar and 3 wheels) = £609
Tuesday, January 09, 2007
Making the vision come true
From the very start of this project I had a vision that the seat on this trike would be a tractor seat - I dont know why, I just did. Ive been keeping an eye on them on ebay, nice big cast iron implement seats - they appear to fetch quite good prices (30, 40, 50 quid) but for some reason they never were quite right. And then it struck me what i really needed was not a cast iron job, but a pressed tin one. A quick search on google turned up a vintage tractor spares trader ( www.vintagetractorspares.com ) not 5 miles from where i work - it was kismet - I had to go there and buy my seat, and so today I did.
The nice thing about building my own trike, is that there are no rules or plans, so when it came to deciding on what tractor seat i should choose, how else should i choose but trying them all out for fit. The helpful lady got out 7 different pressed steel seat pans for me to try. I can't remember what tractors they were all for, but I do know that i rejected the Fordson seat as being too flat and wide in preference for the Fergy T20 seat which was deep and round - just like my own arse. It was £39 and it looks great and very.... well "agricultural" and purposful.
I cobbled up a sitting position tonight out of a reliant wheel, a 5ltr can of emulsion and 2 blocks of 4x4 offcuts - remember the formula - this gave the perfect ride height and position - it meant i can shove the seat forward a bit more (especially if im going to crank the gearstick out of the way). Looks good and feels good :-) And I know now what i'd like the next project to be :-D
And talking of spending money - Ive also bought 4 new rubber engine mounts. the original ones were so soft that 3 of them sheared rather than unscrewed when i was removing the engine. I was shocked at the price. £22 for the 4 (and thats a bargain - reliant dealers want nearly 8 quid each!) Im a bit worried that £20 here and £20 there on "not-noticeable" bits is soon going to eat up my budget.
In a small way to counteract this drain on finances, I am selling bits of the donor, and in a couple of days time a chap is coming to collect his bargain of a chassis for £5 (a fair and square auction win on ebay) and in fact I'll be glad to get it out of my way. However it suddenly occured to me a couple of nights ago while tossing and turning in bed (this project is consuming me) that the engine mounts on the chassis would make a great template reference for the mounts required on the trike frame, so i have made up a jig that references the mounting points. I enjoyed myself sawing, filing, bending and drilling the bits of metal that I then bolted to the chassis and welded the spacers between (so that i ended up with a T-frame with all the mounting points in the right place) However, what i didnt enjoy was working outside in the p*ssing rain - the chassis is out there - I hate this country for this miserable weather - I was just fortunate that I'd kept the roof panel of the Reliant (I dont know why) which made an adequate shelter from the worst of it. I bet they dont have poky garages and peeing rain and tight budgets in california - no wonder they can build fabulous looking machines.
And the other thing that has made me think tonight..... welding. I knocked this template together with my little arc welder. My welding was rubbish. Oh it will hold together OK and there were a couple of good runs, but it was rubbish - I comfort myself a bit with the fact that i was doing it in the dark, in the rain and upside down, but excuses aside, it was poor..... and it made me wonder if i really should entertain the idea of welding this frame myself (note though I wasnt contempating doing it by arc - was going to talk to TVOR about using his MIG) - or should i leave it to the perfect TIG welding of BIG SUR the custom bike builder?
Can you see what it is yet?

Can anyone else see what im seeing? Ive spent a lot of time subtley moving bits back and forth looking for the best layout under the circumstances. And despite the fact that its almost impossible to stand back and get a good view in my poky garage that is full of all sorts of other crap that doesnt help the clear line of sight, I think im starting to get there. Im starting to make some difficult decisions and feel like im getting a shape that doesnt look too bad.
With my budgetry constraints, I am having to make some compromises; for instance, I'd really like to bring the diff closer to the gearbox (it looks a bit to long in the tail in my ideal opinion) and i think i could do this if i had a totally new prop shaft made - as it is ive calculated the absolute minimum that i can have the original prop shaft shortened to.... and i can live with this
I've spent a fair amount of time playing with the hieght and rake of the front end. I was worried about it beign too laid back and stressing the seals and increasing the turning circle. The trouble is that this means making the handle bars harder to reach (though risers or new bars might cure that) and it closes the gap between the wheel and the engine/frame to what i think looks cluttered.... and so ive gone back to the laid back rake and i think im going to go with that - to heck with turning and seals - how often am i going to ride it anyway?!
The radiator has been causing me worries. I have been inspired by some builders who have placed it neatly behind the drivers seat and run the water through the frame tubes, but recently ive thought this is too much hassle and cost for me and besides it kind of compromises the lovely simple rear end, and so ive been playing with positioning at the front (where it came from), and i think its looking pretty good on centre with the engine (note the fan is off center by a couple of inches) and raised up a good 3 or 4 inches - it seems to tuck into the space near the head stock quite nicely. It wont get the full benefit of the fan from where it is, but i figure i can compensate for this by driving like the wind - fans are for whimps who leave the car running while they nip into sainsburys to buy a TV dinner and a jar of instant Birds mellow coffee.
Another important decision I think is the thought that I will now crank and extend the gear lever out to the front and nearside. This might mean that changing gear will feel a bit like stiring the soup, but it will mean that i can bring the drivers seat a fraction further forward AND take the frame backbone through in one straight run to under the seat before it forks out to the rear axle mounts.
And talking of frame backbones / spines, I had a call from Hughie today who says he likes the idea of a single plate/sheet constructed spine (not disimilar to some of the conversations with TVOR) - OMG what has got into these chaps? have they forgotten the time and money pressures im under? I have suggested to both of them that it will look great on their trikes when they build thiers ;-)
Friday, January 05, 2007
One mans tat is another mans treasure
Ive sold the front end steering, suspension, hub/brake assembly from the original reliant donor. I sold it on ebay for £22 - thats a lot of metal and engineering for 22 quid, but then I'm glad i could get something for it instead of simply junking it, and hopefully it has gone on to be useful to someone else....... but i wonder for how much longer?
Stuart, who is currently running 5th in the RELIANT ROBINS Points and roof grades 2006 croydon motor sports league ( http://www.croydonmotorsports.co.uk/ ) drove all the way up from Tunbridge wells (must be at least a 400 mile round trip) to collect my assembly so that he could fit it to his reliant robin race car to replace the one he'd cracked.
It just goes to show that there is nothing so interesting as people :-)
If youve ever wondered what reliant robin race cars look like, check these out http://croydonmotorsports2.myphotoalbum.com/view_album.php?set_albumName=ReliantRobinsLayhamsfarm682006
So now my budget is running at £535 plus £70 for my tank minus £22 for the racing reliant front end = £583. Crikey, that is getting tight. Maybe Barry is right, maybe i cant build a great looking trike for a grand
Thursday, January 04, 2007
Custom Bike Builder

For years Ive seen this guy working in his backstreet workshop, but ive never had the need to go in until now. and how pleased I am that i have.
In the backstreets of Hockley, Birmingham is what seems from the front a little workshop, but once inside is actually a bit of a tardis full of Harley Davidson custom builds, the majority of a corrvett, and some cool subaru off-roader buggy thing in the making.
I popped in to see if they might be able to help with making my headstock and it seems that they can - and then some! My budget and desire to do everything myself is driving me toward making my own frame, but this chap (and i never did catch his name) was suggesting that i might be better off if he built the frame for me. Certainly his TIG welding, pipe bending and jigging facilities do create fabulous frames...... but can i afford it? and am I compromising my experience if i out-source this important part of the job? Plenty of things to think about.
In the meantime I think this chap could be both very useful and interesting :-)
Design decisions decisions decisions
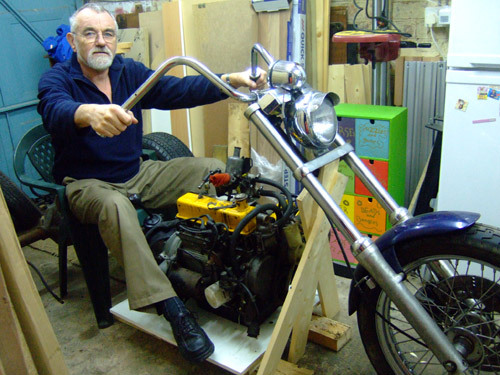
Hughie came over during the christmas break on the pretence that it would be nice to get the families together (festive cheer, good will to .... blah blah blah) but it meant really that he could come and see progress so far and bring over the fuel tank that he had collected from Barry-you-cant-build-a-decent-trike-for-a-grand. Its a lovely new 3.3 gal single filler mustang style tank, the ideal thing for a chopper looking custom; and i got it for a good price at £70.
I sat down in the plastic patio chair come makeshift saddle, straddled the engine and held the tank in position..... and Im not so sure i liked the feeling.
It seems such a shame to obscure my view of the engine. As you can see from the picture TVOR also came over for a supposed christmas family thing, but it didnt take him long to get sitting in the saddle (actually he looks pretty cool there! ;-) and as you can see, the thing does have an appeal with the engine all exposed. Perhaps i should have a tank on the back of the beast and leave the engine exposed? I need to do some thinking
On the subject of TVOR; he keeps talking of 50x25 box section. I keep talking 25 dia tube. whilst i fully accept his arguement that a 50 deep box would be very strong and rigid, Im not so sure it would look great without a huge amount of work in cutting and shutting detailed areas. I cant disagree that a single spine across the top of the engine wouldnt look fab, but if i was going to do that I'd want it curved by an industrial section bender. check out the efforts this guy goes to to create a box section spine http://www.vwtrike.net/june.htm impressive no doubt, but i niether have the time, money or motivation. And so my thinking is still for bent tube.... many sketches to come i think
Subscribe to:
Posts (Atom)