Monday, June 21, 2010

Another section repaired

Up and out there at 7.30 this morning, and straight onto the Off-side engine mounting point. I was worried about the noise i might be making, but soon reckoned that most neighbours would be grateful for the early morning wake up - They should be at work anyway.

Once again, that cheeky Vespa had me fooled. I thought this repair was going to be easier than the last, but sadly not. Once again its a double / triple skin area with loads of spot welds. I took a slightly different strategy with this side - Chop out the whole section and work from there. On the Nearside I'd left the original engine mounting hole in place (not wanting to lose its reference), but this offside was so rotten that I decided to make it all new. And I think this was definitely the best strategy even if it did mean making up 2 plates and filing out 2 lots of 3 holes plus a spreader washer.

You can see from the section picture that the two skins that are spot welded together at this point have been swollen apart by rust. The bit that Ive cut out is the majority of the rust, but as can be seen in the picture, Ive sawn through a rust patch... which means the other half of that rust patch is still in remaining chassis. Im not overly worried. The panel is swollen and it is breaking through a little - but its good enough. I have to keep reminding myself that this will never be perfect - and I keep taking inspiration from memories of roadside workshops in India where shoeless men squatted in the dust repairing and rebuilding vespas as a critical part of their transportation needs and culture. I am sure these guys werent worried about what some self-serving scooter show judge had to say about the authenticity of the renovation...... In fact this isnt a 'renovation' even..... its a 'Rustovation' :-)

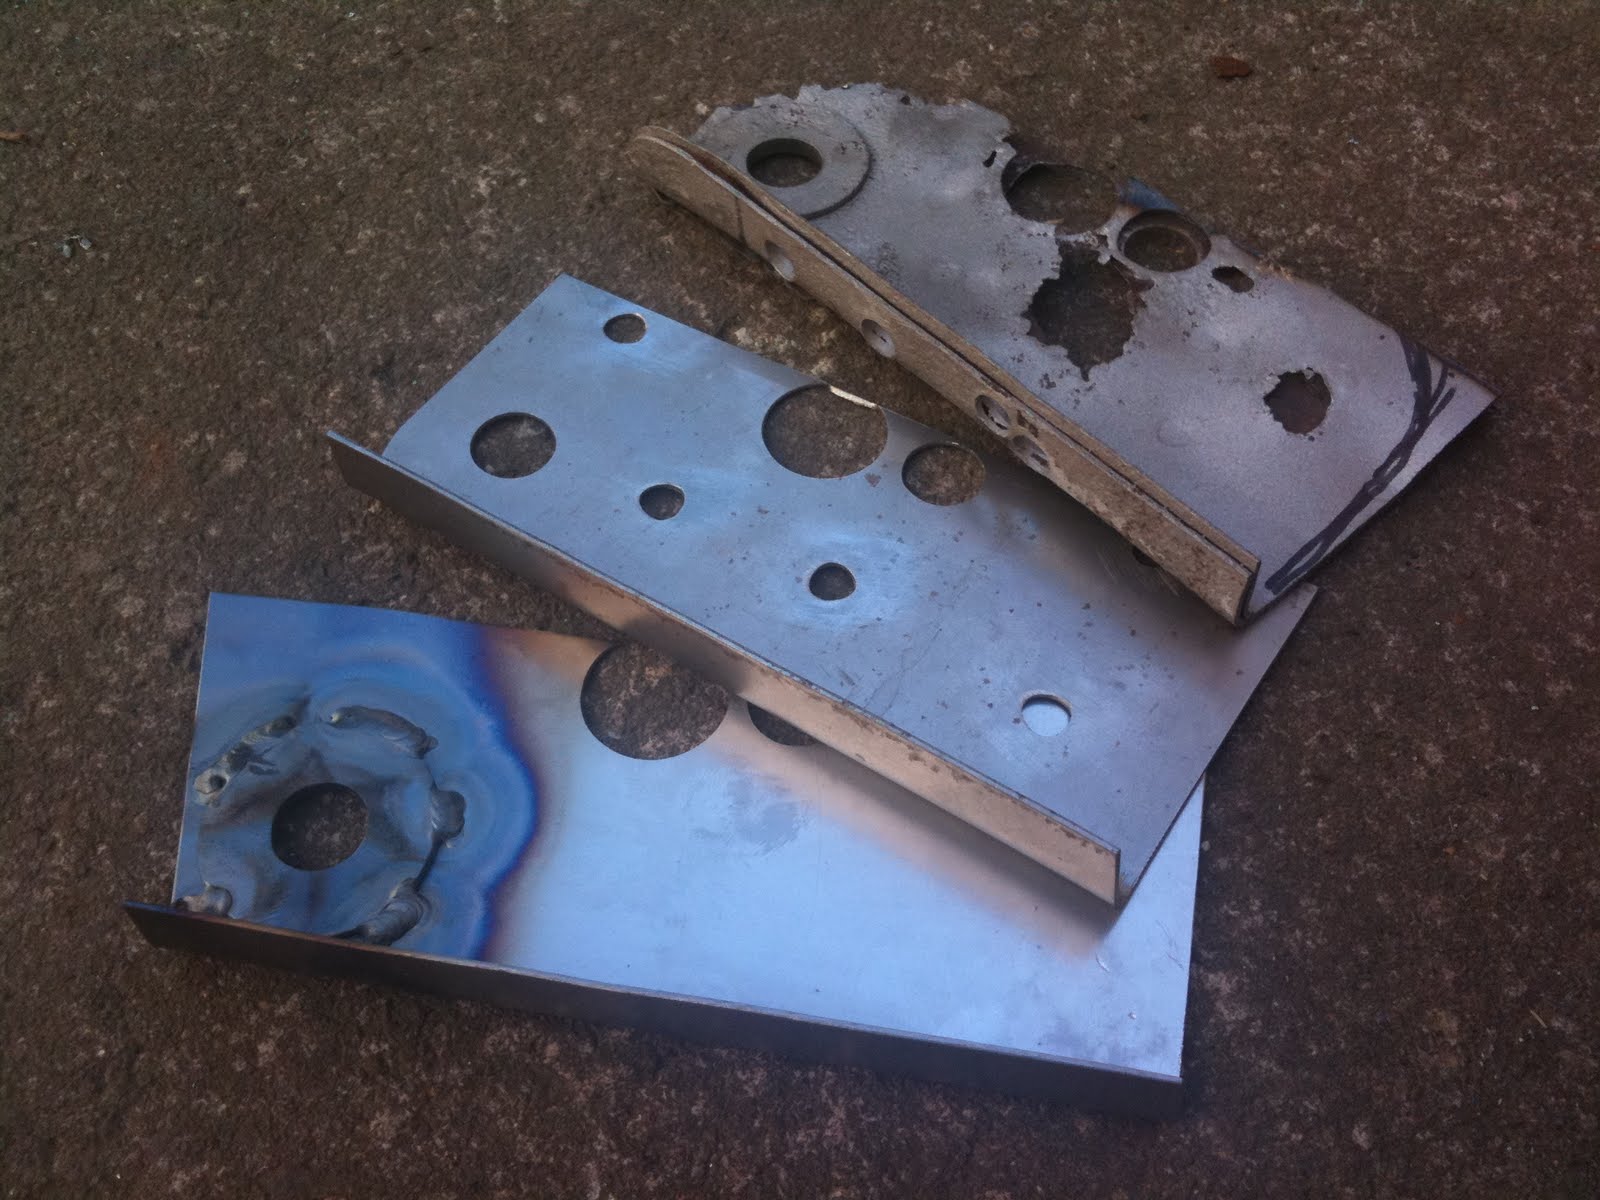
Ive been using a 1.5mm cutting disc on my 115 dia angle grinder - works a treat. With a bit of careful forethought you can cut most things very acurately and easily, though of course there are some tight spots that a disc of that size simply cant reach. Im wondering if I should get a compressor and air tools for cutting - they seem to get into small gaps. My other brilliant tool at moment is my pistol-drill powered nibbler. Absolutely brilliant for a quick clean cut. Its not always easy to get access with the great big drill sticking out the side, and the accuracy needs a little practice, but when the circumstances are right, its perfect.

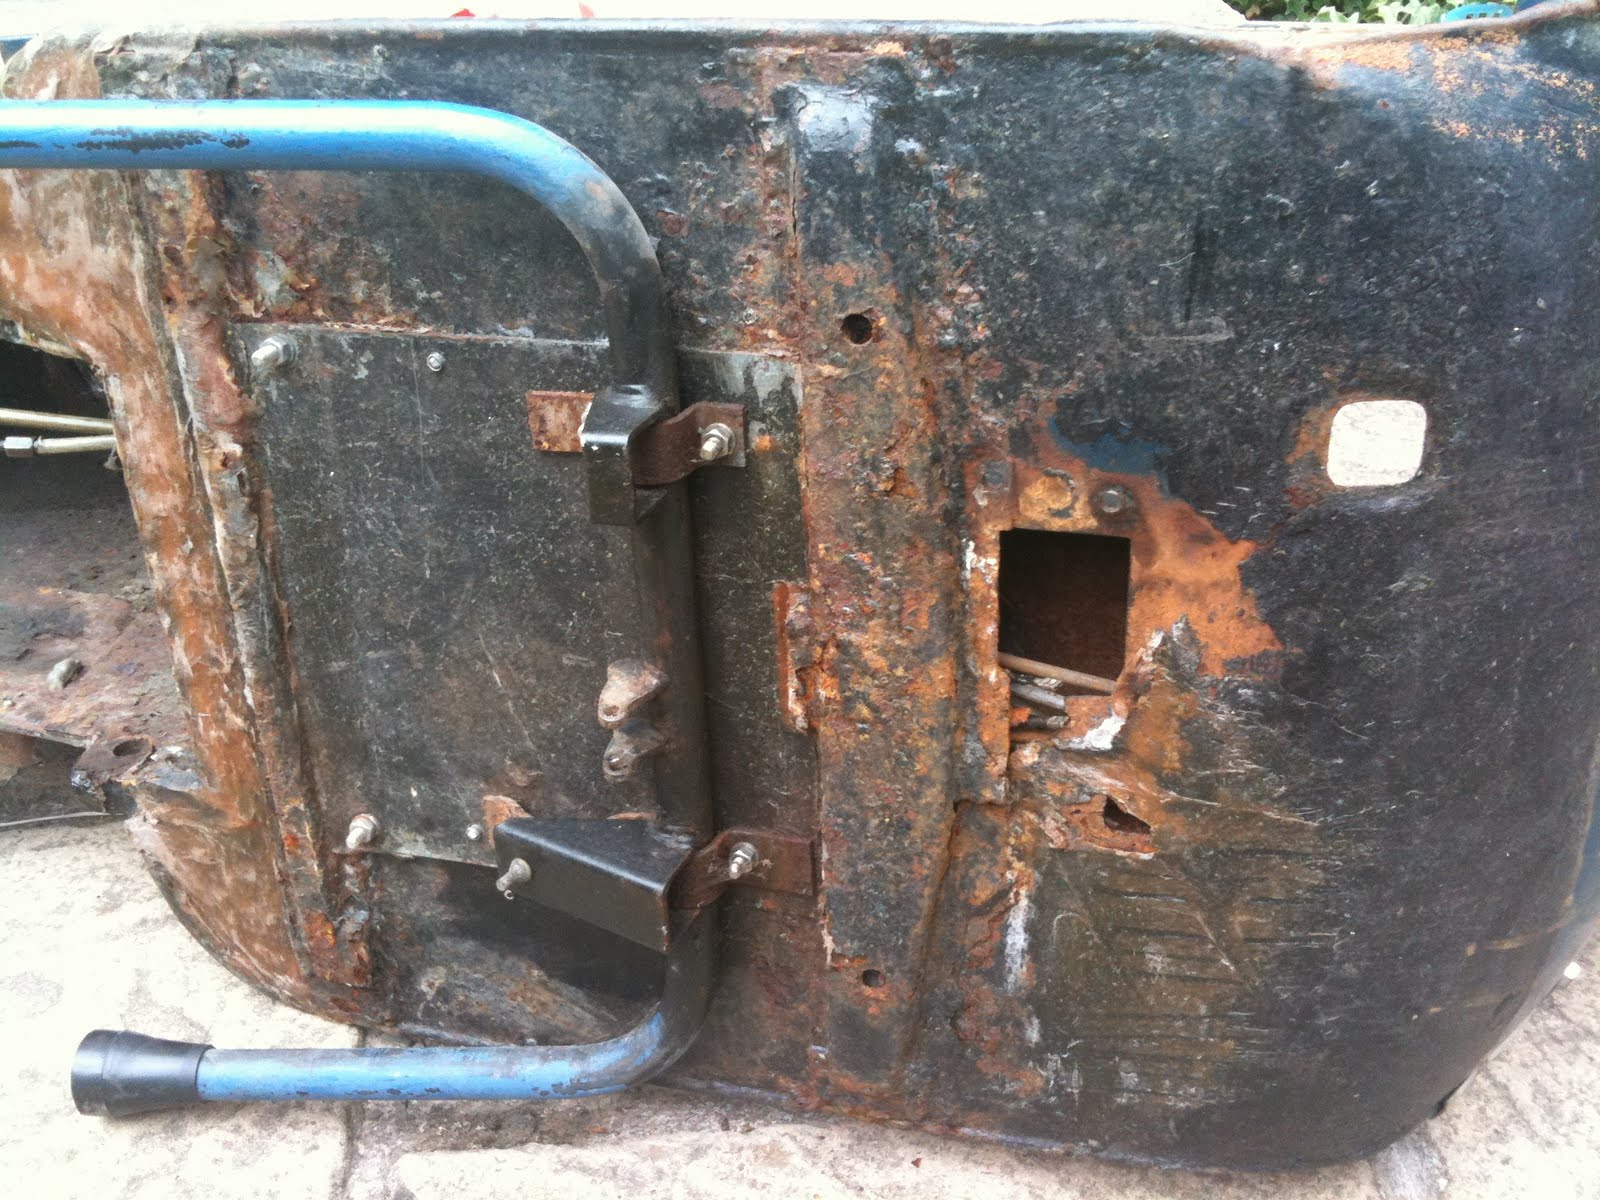
So both parts were welded in separately (Inside bit first) and with a bit of fine tuning (and I mean fine - micro-degrees of the knob on the welder) I am finding I can tack and run without blowing too many holes through the metal (invariably the original metal, and not the new). Getting your body in a comfortable position is half the battle to a good weld run. And finding that when the arc strikes and you've got sunlight reflecting inside your helmet, is a real pain in the ass. The weather has been glorious here so I am working outside (saves mess and risk of fire in the garage) but it does mean that the sweat is constantly dripping inside your helmet, however, the sunshine does motivate me as I dream of actually riding the scooter in this weather :-)

Once again I show a picture of the part welded in place. Not because its interesting or clever, but simply to remind myself that there is progress

Sunday, June 20, 2010

VIN number


Ive been searching and searching for the chassis VIN number. Its supposed to be on the nearside rear arch..... and if you look carefully enough on my frame, you can just about see it.... or at least 2 characters of it ... and a star!

Do you think this frame is really worth the effort? :-/

Right lets get creating

Its time to start making good again, and what better day to start than on Fathers Day! As well as baking me 3 plates of cakes, my fabulous daughters said I could have ALL day in the garage (the perfect gift :-)
I was awake at 6.30am but much like christmas day, I patiently waited until 8.30 before getting out and making a noise in the garage (not that I often go into the garage on christmas day , but you know what I mean)

First up was the nearside rear panel (just above the engine hinge point). My initial plan was to 1. cut out the rubbish, 2. shape a new bit of metal, 3. weld in place, 4. beer in sunshine
It didnt quite work out like that though. The trouble is, there are so many panels and sections that come together at this point that its virtually impossible to simply cut one bit away. So it took me a lot longer than I was expecting (couple of hours?) to get the section cut out, and even then it required me cutting other panels out at the same time in order to get access. I had hoped to do one panel at a time, so that I didnt lose any reference when replacing.

Hugh popped over to see how things were going. I am always happy with my own company in the garage and probably work best when alone, however I really do appreciate a sounding board now and then. I can sometimes get a bit tunnel visioned or perhaps stuck in procrastination over options, and having someone to bounce thoughts off is really appreciated.

Bashing out the replacement part out didn't take very long at all despite the ribbings (which my cheap ebay panel beating set seemed to handle ok once I'd filed the hammer faces smooth!) And then it was time to weld. At last I felt like I was about to make some progress forward - constructing instead of destructing.

The TIG welder was fab. I however wasnt so fab. To be fair, this was an awkward thing to access and as feared, if there was even a sniff of rust in the weld area, there was lots of spluttering.

Its not the best welding in the World, But its certainly not going to come apart, and its a darn sight stronger than it was 2 days ago.
Its not going to look like a professional restoration, and its not going get any show prizes, but I am confident that it will get me on the road safely, and even be of value to someone who wants a tidy solid scooter someday.


Aladins Cave for scooters

Up early on Saturday to get over to Derby to K and S Scooters. Ive had a couple of emails with Kevin about replacement floor pans and it seemed like he might be able to help me with my requirements, so I took the long haul (about an hour) over to the East Midlands.... and what a delight, when i got there :-)
I was a little anxious when I got to the given address... it was a house! but the lady who answered the door directed me round the back to the garden where Kevin had 3 or 4 garages, a large shed and a massive lockup FULL (literally) to the ceilings with scooter bits. In the lock up, heaps of new and shiny bits; in the garages with reclaimed spares - Vespas and Lambrettas.

Kevin is a jolly nice chap who made me feel very at home as a noobie to the scooter world (ive felt a bit uncomfortable with some suppliers who make me feel like a little boy when I ask my virgin questions) and gave me lots of inspiration - though I have to say, when he saw the photos of my frame, he wondered if it was worth the effort - he would probably have scrapped it and found a replacement frame (£400?) - I wasn't deterred.

So after about of hour of interesting chat about the state of the world and current developments in freight rolling stock, I went away with;
1 x new floor pan. £40
1 x cable set (I decided I might as well renew while ive got access) £30
1 x set of floor runners (im pretty well committed now and will need them - the originals were shot). £30
1 x fuel tank mounting gasket. £4
2 x side panel electrical connectors. £4

So if it werent for a ukulele performance this afternoon I would have got started and have that floor fitted by now ;-)

Thursday, June 17, 2010

Shot-blasted.... but now Im under pressure

Have got the frame back from Redditch Shot Blasting.

At first sight it looks lovely - almost as if it has been painted. On closer inspection however, we can see the full extent of the damage that the rust has done. The point to remember here though is that what you are seeing is solid metal - there is no cover up of any rust. This is not painted, just fresh, clear and very exposed metal.... the pressure now is to get it repaired and painted asap, before the exposed metal starts to oxidise again.

In theory, everything is weldable now.

I am delighted to see that the engine mounting plates are pretty sound. All ive got to do is make sure the structure around them is strong


I dont feel overly daunted by it all - rather excited in fact. I've bought some 0.9mm mild steel sheet (£12 from MetalSupermarkets) And Ive got my cheap panel beating set off ebay, and a nibbler and sheet-grips from Frosts so I'm all set to go :-)
BTW Just for the record I'm not counting the cost of tools towards the cost of doing this bike - only materials and processes - So to date ive spent £24 to get it running, £11 on metal and £25 on shotblasting - Grand total = £60


Clean enough to have in the living room now


Wednesday, June 16, 2010

Working on your project is so much easier when the wife is away

Still not sure


I rather like the pale colour and white combo..... but i find it really hard to want to paint anything white! It feels like such a wasted opportunity when you could have any colour you like in the World.

Maybe it should all be one colour??

Maybe it should all be one duckshell blue... at least i wouldn't have to change the logbook details

Saturday, June 12, 2010

Getting rid of old rubbish

Its been a glorious day today. Sun out, family out. What else is a boy to do?
After getting all the bits off the frame - BTW sandwich bags are perfect for storing assembly parts so as not to lose any bits - I sat in the sun with a glass of water to admire my work.
The next step was to get the frame shot blasted. But it occured to me that it would be nuts to shot blast the bits that are definitely going to be chucked - so, with time on my hands, I decided to chop out the rubbish.
First up to remove the plate that a previous owner had pop-riveted in as a patch up job, and Oh what a revelation. This floor was completely rotton. And I am not convinced that the patch up plate actually contributed any structural strength
I decided that I might as well remove the majority of the scrap floor, so got on with drilling out the spot welds between the floor and the spine box section. At this point I have to make an admission - In drilling out perhaps 30 spot welds, I broke 4 drills bits! I was devastated. I havent broken a drill bit in years! I put the bad experience down to hunger and hardened welds.

To help make sure that I buy exactly the right sized replacement floor panel (Ive seen various people selling various shapes and sizes of replacement floor) I decided not to totally destroy the scrap bits, but try to hold them together to show the man-in-the-shop - I screwed a couple of bits of wood in place to hold the two sides of the old floor together.
Once the floor was drilled out and cut off, I could at last see what I was faced with. Actually the spine box section (Im not sure what the right term for this is) isnt as bad as it could have been when you think about the state of the old floor. My hope were raised a little. Maybe I can make this work.
Tonight I made pizzas for the family while they watched the England-USA world cup match. I found that kneading dough is a perfect way to clean grubby finger nails


Getting things in order

I had a sudden panic today. There are so many little tiddley bits that, when it comes to rebuilding, if I forget to get in place at the right time, then I'm buggered to get them in later. I wonder if i should have taken a video of the strip down to give me some clues on the way back.
Getting all the ancillaries off today was pretty straight forward - except for the last 2 or 3 bitches; One bolt holding the regulator, and both connectors for the rear indicator circuit (I had to cut one out in the end I was so frustrated).
Just for reference - if i ever get as far as reassembling this machine. This is the order I think I shall attempt it
1. thread the wiring loom through from the front (dont forget the body grommets)
2. thread the gear/clutch/throttle/brake cables through from the front
3. put the rest of it together

Actually, Ive lost all track of order now. Ive got 160 photos of details that i thought were important during the break down so I hope they will help (I wonder if they are date/time stamped? that would really help)

Whatever - I couldnt get the scooter frame now down to any less parts!

Friday, June 11, 2010

Down to the nitty gritty

I should have done this when I first saw the thing - kicked it over on its side. It would have been quickly apparent this was never going to get through an MOT. I cant believe I was so naive!
At least now, stripped down to the frame (though still some cables and ancillaries to be removed yet) I can man-handle the frame with ease, which makes it much easier for inspection (and I hope, repair)
You can see from the pictures that the floor is completely shot. Someone has at some stage riveted a plate on and done a not-too-bad-looking fibre-glass job at the back of the floor panel. The rust around the brake pedal hole is thick and flakey - i can poke great lumps out with my finger!

I knew the floor was going to be an issue. But I was intrigued to see what the engine mounting holes were going to be like - on my first breif inspection they arent as bad as I was expecting, but the surrounding areas are clearly going to need some work.
How do I feel about the whole thing? well not too bad actually. In fact rather excited. I want desperately to get it shot-blast or chemically dipped (still not absolutely sure which yet) so that it is clean to handle and we can see what the real extent of the job is.
Next job - to strip out the ancillaries, cables and wires and cut off as much of that patching plate and fibreglass as possible so its ready for the stripper

Dismanteling

I had a meeting canceled this morning and the sun was shining; so I took this as a sign that I should spend a couple of hours on the Vespa.
I'd been reading (that reminds me I really need to get 2 workshop manuals - one for in the workshop and one for in bed - the wife complains about the smell of oil) about the potential troubles of removing a corroded hinge-pin from the engine/frame mounting - and this was making me toss and turn at night. So I needed to check this out.
Somewhere along the line, I've made up my mind to resurrect this scooter. Im not sure when this happened and I haven't admitted this yet to the family. I am sure this is how an affair would feel; it all starts off as a bit of a laugh, and before you know it you are smitten and find yourself in bed reading mucky publications.
To be fair to myself - i have only really committed so far to seeing if I can rebuild the frame. This means getting the scooter dismantled, and the frame shot-blast (or chemically dipped). If I find its all too much for me, then I shall wash my hands of it and bung the left over bits on ebay.

I set my sights on getting the 3 big lumps out by mid morning; fuel/oil tanks (this was easy, I'd done it before), the engine/transmission/suspension unit, and the front steering column/suspension/wheel assembly. I want to try and keep as much of the bits together as possible for the time being to minimise the chances of loosing anything or feeling overwhelmed by stuff to do, and Vespa being Vespa is ingenious in the way it keeps all these sub-assemblies so self-contained.
My sleepless nights worrying about how I would drill a 15mm dia x 250mm long hinge bolt out (as described in the Haynes manual) if it was corroded to the point that the rubbers had sheered, were a complete waste of time. The bolt unscrewed and tapped out like a dream. I would like to shake the hand of the man who put a nice coat of copperslip on the bolt when he last replaced it (and then I'd knee him in the nuts for not spraying Waxoyl inside the chassis when he had the chance). As seen in the previous blog posting, the engine unit is a dream. it was out within the hour.
The steering column wasnt too bad to get out - and judging by the state of the C-Spanner locking nut, its been out before (using the same method as i used in the absence of a C-Spanner - hammer and drift). My main concern here was trying to study how all those cables and wires were laid out so that I can re-assemble with ease. I took loads of photos trying to capture how this wire went in here and that cable came out there.
So there I was with 3 large lumps and a tatty frame with wires and cables coming out of each end. Im committed now

Before we go on....

Lets all just take a moment to take our hats off and marvel at the genius of Enrico Piaggio and his head design engineer, Corrandino D'Ascanio. If it wasnt for the Allied Peace agreement of the Second World War, Piaggio might still have been making airplanes. Instead they had to find something else to do with their factories, and as Italy was in such ruin, both financially and socially, it came to them that the people of their country needed cheap transport, and after a couple of strange designs, in 1945 D'Ascanio delivered (after only 3 months of development) what became, there and then, known as "Vespa".
Details have changed a little over time, but in essence thier design remains, after more than 60 years, pure genius. Just take a look at this one peice engine/transmission/suspension unit.


I love this bike :-)

Thursday, June 10, 2010

Always planning ahead


This is just typical of me. I haven't even dismantled the scooter yet (let alone, shot-blast it or repair it) and im already thinking about colours.
I think its important to have a vision.
So here are some different colourways that ive been playing with. Of course there are million variants, and thats before you start putting on the graphics and go-faster stripes (as an example this one looks pretty cool).
I didnt want to have any white on the vespa.... but Im now wondering if it might actually look quite good in places.
I dont have to make a decision for a while yet, but what do you think?

Wednesday, June 09, 2010

in thoughts and out thoughts


Once upon a time on a management training course, I was told of the notion of "in thoughts and out thoughts". It was an enlightening acknowledgment of the fact that we all have moments where our concentration dips 'in' and 'out' of the topic of the moment (and I thought it was only me!) E.g. when we are sitting in an important strategy meeting we sometimes find ourselves thinking about.. say, the ironing, or when we are writing proposals for lucrative contracts, we simply find our minds wandering to things like rust. And so it is with me.

Now the trainer on this course said that 'in and out thinking', was perfectly normal and the best way to manage it - so as to stay in focus with the job in hand, was to acknowledge those 'out' thoughts by jotting them down and in doing so your mind will be purged and left clear for more important things. And so I hope my lunch break photo session of the vespa will leave my mind clear for the rest of the day.

Ive been worrying about the extent of the rust on this poor old vespa. In my mind I have committed to rebuilding it, but just how much trouble is that body going to be? The following pictures show evidence of bad stuff to come. The body filler is clearly covering up trouble, and there are areas of quite severe pitting - why you can even see daylight through some of that metal where the number plate should go!

So now I am floating between "OMG this is too big a hassle right now, and if I start it, I'll never finish it" AND "No worries, there is plenty of good metal. Ive just got to cut back to there and re-make good again"

what to do? what to do?
Oh sod it, that training course was rubbish. My 'out' thoughts have now become my 'one and only' thoughts :-(

Tuesday, June 08, 2010

nice blog about vespa restoration

Just browsing while waiting for a phone call, and came across this nice blog about a vespa restoration
His last entry is about having the body shot-blasted..... and i note that he wrote this in December 2008. Hmm I wonder what the consequences of shot blasting meant to the demise of the blog

Monday, June 07, 2010

just so I dont forget the contacts

Some email conversation with TVOR is leading me to think that
1. Restoring the scooter frame is not such a daft idea.
2. Stripping the frame of all filler and rust BEFORE buying a replacement floorpan might be wise - so that I can make a full assessment of potential money and time drain.
3. In order to get the body stripped, I will have to take the scooter apart. I was reluctant to do this in case i simply got distracted and I create a basket case of bits. However on reflection, If worse comes to worse I could just sell the parts on ebay.
So I wondered how much it would cost to get the frame back to its bare metal?

A very nice lady at Surface Processing Ltd in Dudley, told me that they can chemically dip my scooter frame to remove all signs of paint, rust and filler for £120+VAT (£195+VAT if i want all the ancillaries done too) And I can take it in any time I like (they only take bookings for full vehicle bodies)

A bit more googling and I found City Powder Coaters who claimed on their website to do a motorcycle frame, chemical, shot, sand and powder coat for 45 quid. So I called them and once again a very nice chap (are all strippers nice people?) was very helpful. He said that actually, from what I described, I should get the frame properly chemically stripped first as their process would probably have to depend to heavily on the shotblasting to remove the body filler, and this wouldnt be good for the delicate frame. Once stripped they could do the sanding and powder coating (and I might consider this option). So that was a useful insight; I certainly dont want some industrial shot-blaster working hard to remove bodyfiller out of a hole and accidentally, blasting its way through the good surrounding metal. He suggested I give Sandwell stripping a call...... but i dont seem to be able to get through to them

Quick update - got through to shaun at Sandwell stripping (again, a nice chap) and he reckoned it would be about 40 quid to dip the frame (to get rid of paint, filler and rust) - would take a day, 'bring it round when you want'. So this sounds like a good option.... though I cant help wondering what the difference is between a £120 dip and a £40 dip??

Friday, June 04, 2010

Motorcycle Training

Im not sure if its a good thing or a bad thing that at the age of 47, today was my first time ever riding a motorbike on the road.
Contrary to some peoples understandings, the CBT is not a 'test' - the T stands for 'training' - Compulsory Basic Training. You can however 'fail' to pass (though you simply come back - free of charge - to do more training). The idea being - and it makes great sense - that an instructor gives you basic training on how to handle a motorcycle (up to 125cc) and then checks your riding skills to make sure you are not a danger to yourself or other road users. Its a 5-6 hour course.
There were 4 of us on this session at '1st Motorcycle Training' - all considerably younger than me.... but not necessarily better than me! We were allocated a motorcycle each (mine was a Yamaha SR 125) and we started off right from basics; walking your bike round in a figure of 8. Now this might seem a bit TOO basic, but it gave me great confidence that our trainer, Mark, wasn't going to assume anything about our previous experience and seeings as I had zero previous experience, this was going to be good for me. Incidentally, the bikes are a lot heavier than I'd expected, so getting used to the physical weight of the machine is quite a useful thing to do.
Our training (in a small car-park) soon progressed to driving in circles and figure of 8's, emergency stops and indicator controls. A quick bit of class-room (well it was a converted freight container which doubled up as a bike store) theory on how to use junctions, and we were ready to get out on the road. Hold up! I thought.... I dont know how to use the 'one-down, 4-up' gears yet! That didnt seem to be a worry for Mark.
Before we set off, Mark did give us 3 useful Mnemonics;
1. "Only a fool breaks the 2-second rule" - referring to leaving good space between you and the vehicle in front
2. "If it starts to pour, make it 4" - referring to leaving even more space if it raining
3. "To avoid a shunt, don't be a c**t" - simply meaning, dont drive like an idiot and you'll be alright.
We were kitted with bright orange vests and ear-pieces to hear the instructor, and and off we went. We drove for about an hour with different people taking the lead and Mark giving us varying degrees of instruction and directions - Left turn junctions, right turn junctions, roundabouts this way and roundabouts that way etc etc.
Out on the road - I was surprised at just how intuitive the 'one-down, 4-up' gears were. Sure, it took me a while to get used to smooth clutch control, and deciding on which brake (hand or foot) to use for various circumstances demanded some focus. And of course I kept forgetting to cancel my indicator - but all in all, it was a great experience, and one that gave me much more confidence (and motivation) to get a motorcycle on the road....... all I need now is a motorcycle! Looks like a new Vespa floor-pan is in order

Wednesday, June 02, 2010

Cant help just checking

Look I'm supposed to be working - stop distracting me brain.

Just thought I'd see if anyone had documented a floorpan restoration...... and guess what? "baderbus" has! and hes done a jolly good photo shoot of it too! Follow the whole thread through and you can see hes done a fabulous job
This is giving me much encouragement :-)
Maybe I can relax again and focus on some work for a while

The ups and downs of decision making

Bloody hell - ive never been on such an emotional roller-coaster in such a short space of time.
I decided that I would pop over to see my local Motorcycle MOT man to have a chat with him about my scooter before arranging to drive it there for the test. I was a little worried about the rust in the floor pan - and I would have been gutted to pay £140 on insurance only to find its an MOT failure. I took some photos of the underside with me, and went with fingers crossed (I'd be happy with a caution so that I could at least get a few hours riding on it before deciding what to do with it)
At first the conversation with the MOT man was encouraging (ie he didnt laugh me out of the place) But sadly, the rules are clear - There mustn't be any heavy rust within 12cm of any structural component. As the chassis is monocoque, this is a bit of a grey area - but the fact that the foot brake is within only a couple of centimeters of a rust hole is a clear, no argument "FAIL".
I was a little crest-fallen. I had suspected this would be the case, but had hoped nevertheless. However, I cheered myself a little with the fact that I hadnt wasted any money on insurance and MOT.
So it looks like I have a decision to make;
1. Patch the hole
2. Replace the floor with a new floorpan
3. Get another body/chassis and transfer all my parts to it
4. Get rid of the whole damn thing

As I drove home, I decided to make a little detour and go and ask GranSport if they supplied floorpans. I had already looked these up on the internet and see that I can buy one from SIP for £40-£80 depending on how you read their incredibly complicated online catalogue, but I'd rather buy one from a man in a shop who might also be able to give me some advice. GranSport told me that they had never had a request for a floorpan for a PX (they have only ever done 'old' vespas!) and was I really sure that it would be cost effective after all the effort and repainting? I was beginning to feel fed up again - maybe I really should just dump the scooter afterall. They did however give me another contact - they buy their panels from KnS Scooters in Derby - they might be able to help.
I drove home feeling confused. I dont really need the hassle or cost right now. However, on arriving home I thought I might as well look up KnS. Thier website doesnt give much away, so I called them. The chap that answered could well have been selling paper-clips, he made it all sound so easy;
"oh yeah, we've got those"
"oh.. thats great. Do you need to know my model number?"
"No, they're all the same for the PX"
"Great. How do I get a price?"
"They're 40 quid"
"Right. Do you have them in stock, or do I have to order?"
"Just come in. Where are you?"
"Birmingham"
"oh right, just pop-over - Saturdays are best. But if you cant do that, just give me a call and Ill arrange to be there for you"
"Brilliant! .... and out of interest..... do you consider replacing the floorpan a difficult job?"
"Oh no, not at all. I'll show you what to do when you come over"
And with that, I put the phone down, a much happier and enthused man.
Maybe I shall rebuild this bike after all :-)

Friday, May 21, 2010

As she doesn't have a battery, you have to run the vespa to check the electrics, and it really is a delight to kickstart her - starts everytime, first kick (though I did have a panic at one stage where she died and refused to be kicked back into life.... until i realised that I'd switched the fuel tap to "chiuso" Doh!)
There was a fair amount of smoke at one stage - I had a look at the plug - yes it is a bit damp but not gunky. The recommendation for a health plug (and consequently engine) is that the insulator should be a 'chocolate brown' - I really do need to get out for a run to see how the engine settles.
So I ran her up and went through all the lights - after a quick bit of sandpaper on one corroded lightbulb terminal, and a clean up of the ingenious demountable rear panel electrical terminals, all (well nearly all) was perfect - the headlamp seems to be in alignment, and all the 'dashboard' warning lights work - perfect.

The only non-working bit was the rear brake light - operated by the foot pedal. So to get to the switch you have to drop out the foot pedal which is bolted underneath the floor pan. This was the first time that ive had to get close to the chassis.... which I have to admit, I'd been turning a bit of a blind eye to up until now. The chassis is a bit rusty. Someone at sometime in the past has done me the great favor of not messing up engine settings or original electrics...... they have however had a go at covering up some of the rust in the floor pan. And I guess, in an ideal world I would love to get my hands on the chassis sometime, and reweld new panels in, But for the time being I am trying to not think about the rust and just get it up an running. However, today I could deny it no longer.... thats pretty rusty down there. And the dreaded thought is..... is it an MOT failure? My opinion is that structurally its still strong, and the health of the floor pan (which is not so bad up top) is passable. I really hope so because I think I need to put a hundred or so miles on the clock before I will know if I want to keep and rebuild her [ooh heres a thought! maybe I should book her in for an MOT in Aberdeen]
So anyway - here are some pics with the foot pedal removed.
Needless to say, a quick clean up of the pedal switch terminals, and all the electrics are sound. I could in theory take her right now for an MOT (if only i had CBT and insurance)

I think im falling in love

I love this scooter. Not only am I constantly thinking about it, but I'm starting to care for it too... I worry about its rust and exhaust smoke and I dab it and fiddle with it gently hoping not to make it any worse.
I didnt go out looking for her.. She just happened one day. It was fun to start with, but now its starting to get serious.
For the moment I seem to be getting away with sneeking a little bit of time with her here and there (whilst the wife and kids are out shopping or watching the telly) - But I dont think this is going to be enough. Somehow I am going to have to pluck up the courage and tell my wife what my true feelings and intentions are for this new love in my life.

Thursday, May 20, 2010

Rear brake assembly

Im not sure why I'm blogging this really. Its all terribly dull, but I feel a need to record the journey - if for no other reason, it might be useful to show some of the pics to an MOT inspector - he could at least see the quality of the brake linings, or perhaps this might be useful to show a prospective buyer of the scooter should i sell it - again it would be useful, I think, if you could see some of the internals when looking to buy a second hand machine.
So here is another picture. This time of the rear brake assembly. Again, it only took me half an hour to do the inspection, adjustment and clean up - all looks good in there again and the wheel bearings are fine. I don't see any troubles there for an MOT.

CBT

Wahoo! how exciting - I've just booked my CBT (compulsory basic training) motorcycle test
£110 for a day with 1st Motorcycle Training in Kings Heath Birmingham.
CBT is good for bikes up to 125cc, and lasts for 2 years. You still have to ride with L plates (unless youre on a 50cc or less machine) and you cant carry pillion - all sounds good to me!
I told the wife last night about this - and she was horrified! I think she and I had different views of what I was going to do with this old scooter - So just for my own benefit here is some clarification as to why I'm going to spend £110 on a CBT.....
1. Scooter aside - I rather like new experiences and interesting courses. A day out learning how to ride a motorbike sounds like fun to me (as interesting and as fun as the day workshop I went on make an optical theremin) All these workshops, courses, experiences are what make life so rich and colourful. And I make my living from telling people to do more collecting of different perspectives - so I ought to be practicing what I preach
2. If I am going to get the scooter through an MOT, Ive got to get it to the MOT center, which means riding it there, which mean I need a licence and insurance....... which means I need a CBT
3. If I am going to prolong my life - I would be foolish not to get some expert training about riding a motorcycle on the road

So wife, as to whether I want to keep the vespa as a useful vehicle? - I have no idea or plan.

Wednesday, May 19, 2010

Helmets

I asked Hugh what he thought about Helmets - Ive never owned one, and only ever put one on once - about 30 years ago!. And I'm going to need one just to get the bike to the MOT center. His answer?.....

"I can't offer much personal advice on helmets. The general advice has always been that you should pay the maximum and get the best you can afford. Sounds like advice from a helmet manufacturer to me.
If I was you I would head down to somewhere like J&S Accessories in Digbeth, Bikers World in Coleshill or Hein Gericke somewhere in Brum but I'm not sure where now. All have a good range.
You might want to think in advance about whether you want an "open face" or enclosed helmet cos they'll probably start by asking you that question. And whether it will match the look and colour scheme of the Vespa....."

Crikey! I hadnt thought about matching livery. That throws a whole new level of thinking into the project now - I can see sleepless nights ahead :-/

How do you eat an elephant?.... one slice at a time.

Im starting to realise why scooters are such fun - I haven't even driven one farther than the end of my road yet, and i'm already being seduced by the magic - they are so simple to work on. I think this is why the Trike has stalled for a bit - i need a large lump of time to get it over the next hump of building the chassis - its not a sort of job that you do a half hour here and half hour there on, and so progress is waiting for me to dedicate some serious time.
I have decided to get a press on and try the scooter though an MOT (regardless of cosmetics). So that means making sure brakes, bearings and suspension are good, all electrics work, and..... what else??
Im going to do a little bit as often as I can - in lunch break sized bits.
I started with the front brake today. And as I say - its all just so lovely to work on. Within an hour I had taken off the drum, inspected, cleaned, adjusted,replaced and washed my hands.
All looked good in there. Shoes have lots of life in them, no scoring or glazing. bearing looks fine.
I think I can be confident of that bit going through the MOT.
Tomorrow I'll have a look at the rear brake

Monday, May 17, 2010

Test drive

Well we already know that she starts well, so after a quick dash (not on the scooter - in the car!) to the petrol station with the scooter rear wheel in hand for a pump up (i wonder if thats a puncture?)
I quickly reassembled the wheel and pushed her out onto the road.
Kick start - easy
Engine - sweet
Smoke - of course, but not bad
Clutch in - feels good
First gear - nice
Gently release clutch - WheyHey! it bites well, whoops - bit of a wheelie - And we're off!
I know I shouldnt but our road is a cul-de-sac, it was a quiet time of day, and the sun was out - so perfect for a test run. Brakes work, goes through all gears, accelerates sharper than I was expecting - Sweet :-)
Thanks to Daisy for capturing a quick pic of the momentous occasion.
I did two runs up and down (I could have done more but there was paying work to get on with)
and parked her up very satisfied :-)
So what do I do now? I think Ive got to start getting it ready for an MOT - I wonder what that entails?

Stripping the clutch

Ive got to go away on business soon, so based on the fact that I will miss 2 weekends AND i didnt want to have the scooter in bits for too long (I'm worried I might get distracted by something else and it will simply turn into a basket case of bits ive taken apart) I decided that I would spend an hour investigating that clutch assembly.
As an assembly (which is under its natural spring tension) on the bench, there was nothing to suggest that the clutch was at fault - everything looked and felt as it should - which was a little disconcerting. However on dissembling it, all became clear. The cork lined friction plates had all become 'rusted' (if thats the right word for cork) to the transmission plates - I had to use a screwdriver to prise them apart. No wonder we couldnt get the clutch to free my rocking the bike back and forth in gear - these were practically welded together.
Once apart, they didn't seem to be in too bad a condition, and so some wet and dry sandpaper on the metal and some courser stuff on the cork, I managed to bring everything back to a reasonable condition for reassembly.
From there on it was perhaps another half hour and everything was back in place on the bike. Job done....... Now would it run?

Its got to be the clutch

I still couldnt remember exactly the symptoms that we'd experienced when Hugh and I tried to get her to drive. I even phoned Hugh to see if he could throw some light on my challenge - I wanted to be sure I was at least attempting to tackle the right problem; I mean, there would be no point stripping the clutch if in fact the symptoms indicated a busted gearbox etc.
I concluded that it must be the clutch and so in spite of what Haynes says, I decided to attempt the clutch removal without dropping the engine (Haynes says its possible, but easier on the bench) - and in conclusion I think I would agree with them - its not easy laying on the floor working upward inside the bodywork.... but it was possible.
The majority of my time was spent making a tool for removing the castle-ated retaining nut that sits deep inside the clutch housing. I had the genius idea of using polymorph as a way of creating a pattern of the nut for me to create my tool for - for those of you who havent got any polymorph, you really should get some. Its a fabulous material that is ply-able at about 65degC but goes hard as it cools - I thought that shoving some of it down the hole would give me a perfect pattern of the nut that lay at the bottom. In theory this was probably a genius idea, if it wasnt for the fact that 1. the polymorph got into every nook and cranny down that hole, and 2. the polymorph goes almost rock hard when cool - there was no way i could get the stuff out! I swore at myself (quite alot) as I chipped and carved that sodding plastic out for half an hour before getting back to square one!
In the end I used a lump of good old blu-tac and some engineering blue.
I would like to just take a moment here to thank TVR for pressing an engineering file into my hand at such a young age. I'm pretty good at filing, and better than that, I really quite enjoy it. So thank you TVR for giving me the gift of being able to file metal into useful shapes :-) It took me a fair while, as I had to keep going back and forth to the nut for the fine fitting, but once done and case hardened (I knew that industrial sized oxy-acetylene kit in my shed would come in useful eventually) I had a proper tool for removing that elusive nut - and it worked a treat :-)
So the clutch came off...... but was this the problem?

Friday, May 14, 2010

Will she run?

So it started yesterday. Would it today? I wasnt planning on doing any more on this until maybe the weekend, but Hugh happened to be passing by and, well the temptation was too much.
We rolled it out onto the drive out side my house - and to my delight, she started perfectly.... every time. And with no more smoke than might be expected for a 20 year old 2-stroke.
I was just about to drive it off, when i noticed the real tyre was virtually flat - this was the first time id sat on the thing so hadn't noticed the tyre under any weight. Remind me to get a decent foot pump - mine is rubbish.
So we tried again. And this is where Ive got all confused. I can remember what happened, but it seems at odds with what in theory might happen :-/
Bottom line is - something in the clutch area appears to be stuck - I can put it in (and change) gear and the wheel runs freely, but i cant slip the clutch, so any attempt to try and drive it, simply results in a stall.
So it looks like a bit more tinkering to do -

Will she start?


Ive been quite busy with work recently (which I'm not complaining about) which has meant that I haven't had any 'me-time' to "mess with the ves". So it had been in my diary for 2 weeks that I would take Thursday morning off work to have a go at getting her started - bearing in mind that from what i understand from Ash, it hasnt been started for at least 2 years.
The excitement of Thursday morning had me out of bed and in the garage by 7.30 am - within the hour, id fitted the new ignition barrel - things were looking good.
The machine appeared to have a reasonable spark and compression, but i was worried about the fuel that might have gummed up the carb. On inspection, it appeared to be fairly fluid in there (and I didnt really want to strip it if i didnt need to) so I thought I'd give her a kick. Hmm, not so good. Everything kicks as it should do, but not a chance of a fire or splutter.
The plug was damp so i was happy that fuel was getting through the carb. However, the plug just didnt smell right - it wasnt 'petroly' enough. I guessed that there was still some stagnant petrol in the tank (despite me adding a little bit of fresh) so i decided to drain the tank.... which wasnt as easy as i'd imagined. Requiring me to remove the fuel tank and oil tank; requiring me to remove the petrol pipe to the carb which had to be cut off the banjo fitting; requiring me to go back to GranSportScooters for a 2 foot length of new fuel line (another £4). Eventually all was reassembled - though I think we should take a moment - while the fuel tank is out - of apreciation here for just how ingenious those hooks are for clamping down the side cowls :-)
Once refilled with fresh (and clearly more volatile and vapoury) petrol, I re-kicked.... and re-kicked - still nothing. I was about to give up for the day (i had some real work to get done) when one, almost accidental stomp on the kick-start and she fired into life!
Brilliant! Lots of smoke and noise... but with some twiddling of jets, I managed to stabilize her, and feel very chuffed with a good mornings work :-)

Costing me money already

Fortunately my wife will never read this - she is a fine woman, and she lets me enjoy my projects, but shes not so interested to ever want to read this - which means i can relatively safe in sharing details of expenditures!
Bearing in mind that this is an intermission project - just for fun - and I am only tinkering on it - just for fun - there shouldnt be any need to spend money on this........ except that the ignition key (and there was only one) was fractured and sure enough it broke off in the ignition barrel. So what was I to do? leave it at that and not ever know if the bike could run? No. I decided I would get a new ignition barrel - just to see if I could get it started.... but then do I buy a single barrel? or a set of 3 so that i could use the same key on ignition, toolbox and seat? Well, on the assumption that I might get it going to a point that I might ride the thing, and I didnt want to be messing with the crease of my mod suit by filling the pockets with a collection of keys, I went for the set.

Ive found a great scooter shop in Birmingham www.gransportscooters.com - theyve got some fab bikes there, all the parts i'd ever need and some helpful advise on how to, say..... remove a damaged ignition barrel. The 3 barrels cost £18 (but as I say, they were able to show me what the haynes manual couldnt) So with a few other nuts and bolts - Ive now spent a grand total of £24 on this bike

Wednesday, May 05, 2010

Oh Bugger


Hmm this isn't going to help get the trike on the road :-(

I didnt ask for it (though i have been reading about classic mobylettes - so I guess you really do have to be careful what you wish for) - it kinda just happened. Eldest daughter called me one afternoon and asked me if i wanted a Vespa..... there is only one answer to that...... then she said "OK, I'll tell him" rang off and the rest is history.
Turns out that Ashley's dad had told Ashley to 'get that thing out of my garage!' (it had been standing there for a couple of years) Daughter had overheard Ashley mention his dilemma, and being the darling that she is, she thought of me :-)
So with the help of Sams dad (come on keep up with the names!) and his Landrover and trailer, we all went round to Ashleys dads house and took it away. Ashley didnt want anything for it (turns out he only paid 20 for it 2 years ago), so all was cool with me.
It all seems to be there, turns over, got a spark - but probably needs a 2-stroke carb clean.
What am i going to do with it? Well certainly not let it dominate my money, time or trike space - but i reckon its worth investing a few hours to get going..... another few hours to get it through a MOT ...... and then think about what to do next. Do I fancy it for getting around? well I dont have a car, and fuel is expensive so maybe its a timely gift?