Monday, May 17, 2010

Stripping the clutch

Ive got to go away on business soon, so based on the fact that I will miss 2 weekends AND i didnt want to have the scooter in bits for too long (I'm worried I might get distracted by something else and it will simply turn into a basket case of bits ive taken apart) I decided that I would spend an hour investigating that clutch assembly.
As an assembly (which is under its natural spring tension) on the bench, there was nothing to suggest that the clutch was at fault - everything looked and felt as it should - which was a little disconcerting. However on dissembling it, all became clear. The cork lined friction plates had all become 'rusted' (if thats the right word for cork) to the transmission plates - I had to use a screwdriver to prise them apart. No wonder we couldnt get the clutch to free my rocking the bike back and forth in gear - these were practically welded together.
Once apart, they didn't seem to be in too bad a condition, and so some wet and dry sandpaper on the metal and some courser stuff on the cork, I managed to bring everything back to a reasonable condition for reassembly.
From there on it was perhaps another half hour and everything was back in place on the bike. Job done....... Now would it run?

Its got to be the clutch

I still couldnt remember exactly the symptoms that we'd experienced when Hugh and I tried to get her to drive. I even phoned Hugh to see if he could throw some light on my challenge - I wanted to be sure I was at least attempting to tackle the right problem; I mean, there would be no point stripping the clutch if in fact the symptoms indicated a busted gearbox etc.
I concluded that it must be the clutch and so in spite of what Haynes says, I decided to attempt the clutch removal without dropping the engine (Haynes says its possible, but easier on the bench) - and in conclusion I think I would agree with them - its not easy laying on the floor working upward inside the bodywork.... but it was possible.
The majority of my time was spent making a tool for removing the castle-ated retaining nut that sits deep inside the clutch housing. I had the genius idea of using polymorph as a way of creating a pattern of the nut for me to create my tool for - for those of you who havent got any polymorph, you really should get some. Its a fabulous material that is ply-able at about 65degC but goes hard as it cools - I thought that shoving some of it down the hole would give me a perfect pattern of the nut that lay at the bottom. In theory this was probably a genius idea, if it wasnt for the fact that 1. the polymorph got into every nook and cranny down that hole, and 2. the polymorph goes almost rock hard when cool - there was no way i could get the stuff out! I swore at myself (quite alot) as I chipped and carved that sodding plastic out for half an hour before getting back to square one!
In the end I used a lump of good old blu-tac and some engineering blue.
I would like to just take a moment here to thank TVR for pressing an engineering file into my hand at such a young age. I'm pretty good at filing, and better than that, I really quite enjoy it. So thank you TVR for giving me the gift of being able to file metal into useful shapes :-) It took me a fair while, as I had to keep going back and forth to the nut for the fine fitting, but once done and case hardened (I knew that industrial sized oxy-acetylene kit in my shed would come in useful eventually) I had a proper tool for removing that elusive nut - and it worked a treat :-)
So the clutch came off...... but was this the problem?

Friday, May 14, 2010

Will she run?

So it started yesterday. Would it today? I wasnt planning on doing any more on this until maybe the weekend, but Hugh happened to be passing by and, well the temptation was too much.
We rolled it out onto the drive out side my house - and to my delight, she started perfectly.... every time. And with no more smoke than might be expected for a 20 year old 2-stroke.
I was just about to drive it off, when i noticed the real tyre was virtually flat - this was the first time id sat on the thing so hadn't noticed the tyre under any weight. Remind me to get a decent foot pump - mine is rubbish.
So we tried again. And this is where Ive got all confused. I can remember what happened, but it seems at odds with what in theory might happen :-/
Bottom line is - something in the clutch area appears to be stuck - I can put it in (and change) gear and the wheel runs freely, but i cant slip the clutch, so any attempt to try and drive it, simply results in a stall.
So it looks like a bit more tinkering to do -

Will she start?


Ive been quite busy with work recently (which I'm not complaining about) which has meant that I haven't had any 'me-time' to "mess with the ves". So it had been in my diary for 2 weeks that I would take Thursday morning off work to have a go at getting her started - bearing in mind that from what i understand from Ash, it hasnt been started for at least 2 years.
The excitement of Thursday morning had me out of bed and in the garage by 7.30 am - within the hour, id fitted the new ignition barrel - things were looking good.
The machine appeared to have a reasonable spark and compression, but i was worried about the fuel that might have gummed up the carb. On inspection, it appeared to be fairly fluid in there (and I didnt really want to strip it if i didnt need to) so I thought I'd give her a kick. Hmm, not so good. Everything kicks as it should do, but not a chance of a fire or splutter.
The plug was damp so i was happy that fuel was getting through the carb. However, the plug just didnt smell right - it wasnt 'petroly' enough. I guessed that there was still some stagnant petrol in the tank (despite me adding a little bit of fresh) so i decided to drain the tank.... which wasnt as easy as i'd imagined. Requiring me to remove the fuel tank and oil tank; requiring me to remove the petrol pipe to the carb which had to be cut off the banjo fitting; requiring me to go back to GranSportScooters for a 2 foot length of new fuel line (another £4). Eventually all was reassembled - though I think we should take a moment - while the fuel tank is out - of apreciation here for just how ingenious those hooks are for clamping down the side cowls :-)
Once refilled with fresh (and clearly more volatile and vapoury) petrol, I re-kicked.... and re-kicked - still nothing. I was about to give up for the day (i had some real work to get done) when one, almost accidental stomp on the kick-start and she fired into life!
Brilliant! Lots of smoke and noise... but with some twiddling of jets, I managed to stabilize her, and feel very chuffed with a good mornings work :-)

Costing me money already

Fortunately my wife will never read this - she is a fine woman, and she lets me enjoy my projects, but shes not so interested to ever want to read this - which means i can relatively safe in sharing details of expenditures!
Bearing in mind that this is an intermission project - just for fun - and I am only tinkering on it - just for fun - there shouldnt be any need to spend money on this........ except that the ignition key (and there was only one) was fractured and sure enough it broke off in the ignition barrel. So what was I to do? leave it at that and not ever know if the bike could run? No. I decided I would get a new ignition barrel - just to see if I could get it started.... but then do I buy a single barrel? or a set of 3 so that i could use the same key on ignition, toolbox and seat? Well, on the assumption that I might get it going to a point that I might ride the thing, and I didnt want to be messing with the crease of my mod suit by filling the pockets with a collection of keys, I went for the set.

Ive found a great scooter shop in Birmingham www.gransportscooters.com - theyve got some fab bikes there, all the parts i'd ever need and some helpful advise on how to, say..... remove a damaged ignition barrel. The 3 barrels cost £18 (but as I say, they were able to show me what the haynes manual couldnt) So with a few other nuts and bolts - Ive now spent a grand total of £24 on this bike

Wednesday, May 05, 2010

Oh Bugger


Hmm this isn't going to help get the trike on the road :-(

I didnt ask for it (though i have been reading about classic mobylettes - so I guess you really do have to be careful what you wish for) - it kinda just happened. Eldest daughter called me one afternoon and asked me if i wanted a Vespa..... there is only one answer to that...... then she said "OK, I'll tell him" rang off and the rest is history.
Turns out that Ashley's dad had told Ashley to 'get that thing out of my garage!' (it had been standing there for a couple of years) Daughter had overheard Ashley mention his dilemma, and being the darling that she is, she thought of me :-)
So with the help of Sams dad (come on keep up with the names!) and his Landrover and trailer, we all went round to Ashleys dads house and took it away. Ashley didnt want anything for it (turns out he only paid 20 for it 2 years ago), so all was cool with me.
It all seems to be there, turns over, got a spark - but probably needs a 2-stroke carb clean.
What am i going to do with it? Well certainly not let it dominate my money, time or trike space - but i reckon its worth investing a few hours to get going..... another few hours to get it through a MOT ...... and then think about what to do next. Do I fancy it for getting around? well I dont have a car, and fuel is expensive so maybe its a timely gift?

Wednesday, August 26, 2009

Tube Benders

Just in case i need to get my tubes bent professionally - I called some.
I started with Barnshaws - as they came up first on a google search and ive always been impressed with the arch of railway line outside their factory in Tipton. Helpful as they were, my job is clearly too trivial for a company that has the "capacity to curve tubes up to - 1067mm o/d." So they put me onto Formbend who were also very helpful but only had one set of formers for my diameter of tube, so unless I wanted all my bends to be of 80mm radius, they couldnt help me. So they put me onto Accurate Section Benders who appear to be able to do whatever i want.
I shall send them a spec and see what thier prices are like

Monday, August 24, 2009

Bending pipes


I have been avoiding this for ages. I have been scared of bending the tubes for my frame. Why have I been scared though?
1. I was concerned that the pipe-bender wouldn't be up to it.
2. I was worried that I'd get it wrong and have to scrap some of that expensive pipe.
3. I didn't really have a fixed frame design
And so I simply kept avoiding the issue - and the trike project has stayed dormant
However, following through with my holiday resolution and bolstered by a renewed motivation and energy (that comes with a sunny Sunday morning) yesterday I bent some pipe :-)

I now see why so many trikes are made out of angle iron - bending pipe is not as simple as you'd like it to be.

I still didn't really have a fixed design for the frame, but I took an intuitive stab at what I thought 'looked nice' for the lower rails, plotted the curve on a piece of cardboard and just went for it. The pipe bender (12 tonnes) works a treat. I remember someone telling me that the secret was to bend the pipe in little bites, working round the curve - as opposed to simply pumping away in one bend.
I had spent some time a few months ago filing out one of the cast dies to suit my specific diameter of tube, So I was all set..... or so I thought.
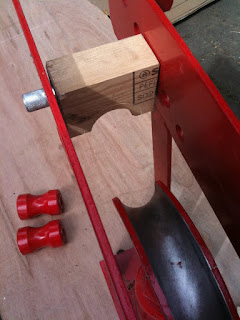
You will see from the photos that although the pipe will bend, the pressure is such that the rollers are marking the tube (i don't think this is a 'dent' as such - ie not a significant structural weakness - it just looks horrid)
And so I made up a couple of wooden formers to spread the load a bit - and these worked well until they broke up (as you'd expect under 12 tonnes).
By this time it was "Happy Hour" (another bring-back from holiday) and so I packed up for the day.
And so I'm left with another predicament that if I'm not careful will turn into another barrier to making progress..... what to do about bending tubes? As I see it I have 4 options...
1. Just get on and bend the buggers - it might not look lovely but what the heck - you can probably linish out those marks - this is not my preferred option
2. Get some big rollers turned up that will suit my tube - expensive?
3. Get someone else to bend the pipe for me - but could i specify the design? this is something that I'm inventing on the fly
4. Get someone else to bend the curvy parts for me and then I weld them in between the straight bits - this seems like a bit of a fag and a risk to the integral strength of the frame, but my welding experience with CWB shows that I can make a good enough weld both structurally and cosmetically that this might be the simplest way to go - and it might give me more flexibility when it comes to working things out on tube that need to bend in more than one plane. I shall phone a bender this afternoon

Holiday resolution


Aren't holidays great? :-) I love the sense of freedom, both physically and mentally. I can spend ages sitting on a beach looking out to sea or balancing some rocks, enjoying all the conversations that rush around inside my head. I always have bright ideas when Im on holiday and I also get a good clarity on whats important in my world.
Forget New Year for making resolutions - Holiday time is when I make my resolutions. I invariably resolve to get on with something when I return, and this year was no exception.
And so on my return from holiday, I set about clearing the garage out so I could get some good access to the trike again. I chucked out the fridge freezer that we used for storing drinks in and I stripped the piano string frame to its bare minimum and moved it into the garden where it now sits as a bit of musical sculpture. And so the project can start again :-)

Sunday, March 22, 2009

New skills, new solutions


In its-self, this is not particularly interesting or clever, but it wasnt until I was tidying up after a days work on making my welding trolley that I had a sudden realisation just how the world had changed for me.
Now that I have a degree of skill to weld metal together (though I still have a lot of practice to do be be anywhere near good) and now that I have the equipment to do so, my world has changed - or rather my world has expanded - as if Ive just opened a door in my life that until now has been locked.
This little jig is neither clever or interesting - but it is an illustration of how my mind can now explore solutions that until now werent available to me.
I needed to bend some 50mmx3mm flat strip into an odd shaped bracket - before i had the facilities to weld I would have crudely bashed the metal into shape in the vice, but now that I have welding available to help me solve problems, without even thinking about it, I simply made a little bending jig, and 30 minutes later, I had a device that could create far more accurate (and a darn sight quieter) bends and shapes
As I say it wasnt until the end of the day that I realised just how much the acquisition of a new skill (and tools) can shift (or widen) your approach to solving problems...... I wonder how this trike might progress if I were to take a course on embrodery?

Wednesday, February 25, 2009

Top TIG tips for trike welders


What have I learnt from a 2 day welding course? Well here is a simple bullet list of some of the notes I jotted down over the 2 days.
- TIG welding is a fine craft. Unlike arc-welding, TIG is quiet, clean, fine and gentle. At times a fine weld can feel a bit like jewellery making. Watching Tom lay down a root weld was sometimes difficult to actually see his hand moving at all. Any thoughts of wacking down a couple of yards of half inch fillet weld are a bit mis-lead.
- Keep the tungsten electrode tip clean and sharp. There really is no point carrying on welding when you've burnt the point off. Its certainly a pain to keep stopping and grinding the electrode, but a clean point makes a world of difference. Hopefully as my skill develops, I wont have to make so many trips to the bench-grinder.
- The electrode tip can protrude beyond the gas shroud pretty well as much as you like. Typically 1/4" to 1/2", but as I found out, in tight spaces you might want to extend the tip out quite a way; you just have to invent a smart way to keep the shield gas contained on the arc.
- Although the TIG torch has what seems like a 'handle' - you are not obliged to hold it like that. holding the shroud like a pencil gives far greater control, and often an awkwardly positioned joint might be accessed best with a quite odd upside-down grip. I was surprised that holding the shroud wasnt as hot or dangerous as i'd imagined
- I like to wear thin leather gloves as these give the best possible 'feel' of the objects you are working with. However, I soon learnt that i was better off with a thin glove on the hand with the filler-rod, and a thicker glove on the torch hand (especially when pencil-gripping the shroud)
- Keep the tip perpendicular to the line of weld, though a slight feed in angle is ok.
- Planning a section of weld is critical. how you position your arm, body to ensure a smooth and consistant travel makes for a lovely weld.
- Using a foot-switch helps with ease of welding. ie you dont have to fiddle around reaching for the thumbswitch on the torch handle - particularly if you are pencil gripping the torch. I think I shall have to invest in a foot switch for my own welder.
- It appears that 50A to 90A is going to be quite sufficient to weld my tube.
- For what I'm going to be doing, I dont need to switch on the pulse option (especially useful for aluminium), or 'slope-down' (crater-fill)
- Gas flow of about 4-6 liters/min
- Try different face masks. I used an auto-darkening mask which seemed to work well for me, but TVOR didn't get really going until he'd ditched the auto-darkening mask for a much darker fixed mask.
- practice, practice, practice

All good things must come to an end


TVOR and I had been pondering on what would be the perfect length of a welding course. Initially I had thought that one day would surely be enough to pick up enough tips and tricks to go off and practice at home. But after doing the first day of this course, I was very glad to be looking forward to a second day to do more practice under the guidance of an expert.
However come the end of day 2... i was pretty bushed and needed some time out to think about what I'd learnt. So all in all I think a 2-day welding course is just about right..... which is probably why CWW design it that way.
While TVOR was having a go at fillet welding stainless steel and aluminium, I finished off my course with welding up the section of my own pipe that id bought with me - a section of the real tube that I will be using for the Trike. In theory the next proper bit of welding I might be doing after this course is highly likely to be on the trike for real - so I had to bite the bullet at some stage.
Im not convinced it was my best bit of welding that day, but I was sure as heck happy enough with it and there is no way those bits of metal are going to come apart - this is going to be a safe trike as well as a good looking one too.
So thanks to TVOR for being there and sharing the experience with me, and thanks to Tom for his support and encouragement

Awkward welds


Working on the test pieces on the benches is great for developing the skills, but lets face it, how much of my trike am i going to be able to weld in 'class-room' like conditions? At the risk of trying to run before I could walk, I was keen to see what it felt like to have to weld awkward joints in awkward positions, so Tom set me up a couple of scenarios - an acute angle, and an overhead weld. I can happily say that if im ever faced with an overhead weld, i'd rather turn the project upside down ("yes Sarge, i DO think it would be better if we roll that Mark VIII (Liberty) tank over, you know how much overhead welding does my neck and back in")
As for the acute angle in an awkward position, well I reckon those are just about manageable - as long as you prepare the site to get yourself comfortable. I reckon one of the keys to a successful and tidy TIG welded joint is to prepare your working area so that you can get in a comfortable and braced position. Tom talks of tack welding bars and braces onto the job simply for the welder to rest/lean/support against (then grinding them off after the joint is made)

Practice makes perfect


Our course ran from 9am to 4pm. I thought it was a bit light-weight to be finishing at 4pm..... until about 3pm when you realise that actually this is quite tiring! Not only on the muscles, but on the concentration and also the eyes. So 4pm seemed like a reasonable time to pack up when you got there.
I was also surprised that there was no tea or coffee available (there was a sarnie van over the road) but on reflection, there just wasnt enough time to stop for trivial things like a cup of tea - this was full on welding. Tom demonstrating, us attempting, Tom guiding, us attempting..... practice practice practice.
The great thing was that we had endless consumables (gas, filler rods, tungsten electrodes - and man we consumed our fair share of those) and endless material to weld together. The TIG machines we were using were the size of a chest freezer and had an endless duty -cycle so there was simply no excuse not to practice welding.
On reflection we must have both welded for 6 hours a day - for 2 days..... thats 24 hours of nonstop welding (if you dont count the numerous pauses to regrind the electode tips that we kept burning off) - so at an estimated welding rate of say 3mm/second (if i learnt anything these last couple of days, its that TIG welding is a 'gentle' process) - thats 250 meters of welding between us [that cant be right can it? the numbers stack up, and we didnt do anything other than weld - even if you halved that figure to account for grinding tips and watching Tom demonstrate - thats still a heck of a lot of welding practice for a couple of amateurs]

Lets go and learn


There is only so much you can learn about welding from watching youtube tutorials and reading books. In the end you have to get some master guidance and then lots of practice. So with that in mind, TVOR and I set off to Coventry to spend a couple of days in the company of expert welder Tom at the Coventry Welding Workshop.
CWW appears to be joined with CBW (Coventry Building Workshop) where a number of youths seemed very productive in the plastering and bricklaying bays. However on the other side of the wall - in the CWW welding bays, TVOR and I had the place to ourselves. Heaven :-)
We had requested some hands on TIG learning with minimal theory and plenty of practise - and that is exactly what we got. Within minutes of arriving, Tom had us welding! He demonstrated a couple of runs (making it look of course Oh-so-simple) and then got us to work.
When I booked the course I mentioned that I was building a trike out of 2" pipe so Tom had read prepared for us a tray of cut and beveled 2" pipes - it was clear that he wasnt going to let us stand around doing nothing.

Tuesday, February 10, 2009

INTERMISSION

There will be a brief intermission in this project while the builder waits for warmer days to start handling cold metal again.
In the meantime we bring you BLACK CHISEL
Enjoy, and please tune back to Black spanner in a a few weeks time where you will see a renewed enthusiasm to get a rolling chassis :-)

Tuesday, February 03, 2009

Learning to weld

So not much physically happening on the trike - but that doesnt mean that things have gone quiet.
After my initial practices at TIG welding (BTW my plasma TV is still hanging on the wall ;-) and after watching a whole bunch of youtube welding tutorials, I realise I am nowhere near good enough to create a trike frame that i'd be proud enough of to see on the cover of BSH. And so i need some training.
Fortunately there is a welding training college not far from here which run courses not only for apprentice marine pipe welders but for the public DIY man too.
The people at Coventry Welding Workshop seemed very accomodating, and when I mentioned this to TVOR, he seemed very interested too...... So weve booked a 2 day workshop for the end of this month. Weve asked for a very much hands on/lots of welding practice event with minimal H&S/metallurgy nonsense - and the coventry welding workshop people seem happy with that.
So not only will this be a gaining new skills session, but a father and son bonding moment too :-)

Monday, December 01, 2008

getting my finger out to weld


I wrote my masters degree project on the subject of 'everyday creativity' - what is it? and how might we develop it? My conclusion was not earth-shattering..... its not about being 'creative'.... its all about having the drive to overcome all the barriers to doing something new.
For weeks now my new TIG welder has sat in its box, while i find this excuse and that excuse not to go and try it. To tell the truth, Ive also been a bit scared of it too - its expensive and it has heavy duty electrics and it makes fire etc. But this weekend I forced myself to go give it a try - How nuts is that? i had to force myself to have fun with my new toy! - the easier route is (and has been) to go and do some more email :-(
Of course once you've got over the barrier and actually started getting on with it, the task is never as daunting as you had imagined. It took me about an hour to get the thing all wired and plumbed up, but finally there were no more excuses left, there was no alternative but to switch it on..... and man what a pleasure it was :-)
I had decided to try it out in the open - where if something went wrong i might be able to minimise the total destruction of my house. In the event though, the Tig welder was quiet, splatter-free and an absolute pleasure to use. I still need a lot of practice and to learn about all the variables of the settings, but i think it can be seen from the practice joints i was making, that TIG welding is a wonderful process.
So encouraged was i by this experince, that i went on to make a TV bracket - and made a right pigs ear of the welding.... so much to learn, so much to learn. Oh well, I am encouraged enough to give it another go.
Only barrier now to getting the Trike frame done, is that im now going to have to make a welding trolley first because i dont want to have to set up and take down the welding kit every time i want to use it

Another restart


I seem to keep restarting this project as often as a robin reliant on a cold and frosty morning.
And here is another official restart.
Things have been busy, and so the trike has had to take second position in my priorities and thinking. For one, Ive chucked the towel in on a regular job and gone and set up my own company - and so it kind of makes sense to put some effort into that if im ever going to afford to keep this trike.
However, I have had some moments of progress.
1. I bought my welding kit. Brilliant! a Parweld XTI180P DC Pulse Tig Inverter. It cost almost twice my budget, but i felt it was necessary if Im going to do this well
2. I managed to get a half day in the garage to file out the pipe bender die to suit the dia of my frame tube (who needs a gym when you can spend 2 hours sweating with a file and a lump of cast iron)

And so little by little we go forward

Wednesday, September 03, 2008

Welding


I'm getting so close to buying my welder now - I cant put it off much longer. Soon, this trike is not going to make any further progress unless I simply join metal together.
I have been focused on buying a MIG welder as I have assumed that TIG welding equipment is out of my financial reach.... However after a couple of conversations today, I'm wondering if I ought to investigate a little further

Equipment aside, I have to admit that i dont actually have a great deal of experience of either MIG or TIG welding, so Ive just spent a fabulous day with TVOR getting some practice in with his MIG welder (actually, from the picture it looks as if TVOR is having a little too much of a relaxed time).

Im not sure if I've worked out the exact science of creating a great weld yet, but I do feel much more confident to go and practice some more (lots more) ..... all I've got to do is now is buy a welder... but which sort??

Sunday, August 31, 2008

Every schoolboys dream


Surely joining a car engine directly to the rear axle must be something that every dirty-fingered schoolboy must have enthusiastically discussed with his mates at sometime!
Well, today I finally made my dream come true - and i have to say, I was very excited with the result. All I've got to do now is build the frame and start the engine!

Unclutering the rear axle


Its a wet sunday morning so i figured that no neighbours would be out in their gardens and consequently bothered by me grinding brackets off my read axle. It took me far less time to do than i thought it would, and gave me a great sense of achievement (those redundant Reliant brackets have been niggling me for a while)
Ive decided to leave the original leafspring pads to mount mudguard brackets to.
Of course it would be lovely to flatten the pitted rusty axle tubes with some pro-sandblasting, but time and money wont run to that, so i think i might get an angle-grinder lap-wheel and just give it a once over before a coat of paint

Sunday, July 20, 2008

getting some perspective


Its amazing how you can get so focused on the details of a job sometimes that you forget to stand back and see if the bigger picture is still as you planned in your initial vision.
Hugh came over today, and the sun came out (it always does where-ever Hugh goes) and so it seemed like a good excuse to get the Trike out of my pokey garage so that i could get better all round view of progress so far.
We shuffled the engine and front end back and forth by a half inch here and a mill or two there. We sat in the seat and jacked that up and down. We imagined what different handle bars would feel like.... and all in all, it felt good - I think im still on the right track.
One design objective is to ensure that I keep the length of the vehicle short enough to be in beautiful proportion (many trikes appear to be too long to me) - but to achieve this the headstock has to come in close to the engine block meaning that the radiator would have to sit outside (in front) of the two front frame tubes (i'd ideally fit the rad in between them to keep things tidy). As we jiggled the bits back and forth, I used the word "compromise"! Hugh was quick to pick me up on it.... but that now leaves me with some head scratching and fine details to work out if im going to keep it short AND fit the rad in the frame as i want.
The other point that raised its head as we stood around the front end was; just how much of an angle do the forks have to rotate through while turning (it has an impact on where i weld the frame to the headstock) - so Hugh is going to have a measure of the rotation on his own bikes
There is heaps of design work to do still, but im confident and very happy that i am going in the right direction

Friday, July 18, 2008

Shafted


Excellent - I now have all the components I need to get on with building my frame. Up until now i havent been able to bolt down the engine to my jig because i didn't have an exact propshaft length... but now i do.
Dave Mac Propshafts (www.davemacprops.com) in Coventry took a bit of finding on the internet - eventually through a special car build forum - But im glad i did find him as they turned out to be jolly nice chaps with a quick and professional turn around.
OK so it cost me £45 - money i can barely afford on this project now, and some people have suggested i should have done the job myself - but at least now i know i have a sound and balanced propshaft.
There were alternative methods to this -
1) a direct coupling as the rear axle is rigid - I fancy doing this one day - bolting the rear axle directly to the gearbox, No propshaft at all!
2) a new yoke and shaft set up - which apparently would have been a better performance arrangement (I suspect performance isn't going to be an issue on this trike.... for one reason or other).
However at the end of the day shortening my own propshaft was the cheapest option... and so i went with that.
What you see here is the absolute shortest that you can modify a standard reliant propshaft to. 260mm (inside that short bit of welded tube, the 2 UJ castings are actually touching each other)

Wednesday, July 16, 2008

fish mouths


Now that I've got all that lovely tube lying on the floor of my garage, I couldn't resist seeing just how difficult it would be to cut my welding joint fish mouths.
Cautiously i cut off an 8" section (that's about £2.30! A whole pints worth!) and despite my best calculations and paper templates, got the first one completely wrong - i cut to a depth of half the diameter - which in theory would be correct if i was making it out of tube as thin as paper. My second attempt (as seen in photo) accounted for the wall thickness AND a weld bead - which means that the fish mouth isnt so deep (and requires far less filing) - ie its the external surfaces that I need to make flush, not the internal ones.
I reckon that the work of cutting and shaping the joints wont be too hard. The challenge is going to be protracting the profile to cut to; Theres a distinct lack of edges to reference to (and this practice one was a simple right angle!).
I suspect its going to be a job of tailor-making each joint with loving little file-and-fit matchups. One step at a time..... one step at a time.

Tuesday, July 15, 2008

Tube arrives


What do you think £222 of raw trike frame tube looks like?
Sadly its not as much as you might expect
BUT the smell is fabulous :-)
And the excitement of finally having all the ingredients now to create this masterpiece is worth every penny:-)
I hope i didn't bore the delivery drivers with the story of my project. As you can see they seemed interested enough to be considered an instrumental part of this exciting journey.
I really am feeling very happy about all this at the moment :-)

Sunday, July 13, 2008

Readers rides


You know things are hotting up when you can get your wife to show a degree of interest.... well, to tell the truth I had to drag her in there... shes still not very interested really. However, she does leave me alone to get on with my thing, so I cant really complain.
I wonder if she'll be interested in doing the modeling for the BSH shoot? :-/

Pipe bender arrives


Look at the size of this monster! It weighs a ton. No wonder it cost £23 to deliver.
It doesn't have a die to exactly suit my pipe size. There is an 1-1/2" and a 2" dia die, but not a 1-3/4" (44mm - my pipe size)
So does this matter? should i line the 2" die with a 3mm thick copper liner?
Im not sure how easy it is going to be to bend tight bends or compound curves..... maybe not for no reason do trike builders use 2"x2" angle iron

Thank you


I'd just like to officially record my Thanks to TVOR and Hughie for encouraging me to make my own axle clamps.
I didn't want to do it. I'd have been happy to pay someone to make them for me. But I have made them myself and Ive loved every moment and feel rather proud of my work.
I have to say though, that its cost me considerably more to make them myself rather than pay an engineering shop to make them for me - my files, new scribe, square and layout blue came to more than a couple of machined lumps of steel - however, now i can make axle clamps for ever more. if anyone needs a pair making, I'm the man - £60 a pair.
So Thanks for the encouragement - I so nearly missed out on a lot of fun and a little bit of self-fulfillment :-D

Wednesday, July 09, 2008

In the end you have to decide

Well ive made the decision and the commitment.... Ive ordered my frame tubing. it is more expensive than i'd hoped (i forgot all about the VAT - and i opted to have it delivered) And I've gone for the normalized condition (which is more expensive) - I spoke with a steel stockist who suggested this would be best for bending and welding.

BS 3602 CFS 360 NBK

44.45mm x 3.25mm

3 lens @ 6mt middled

18mt @ £9.39 = 169.02

Carriage 20.00

Vat 33.08

Total 222.10

I think i only need about 12 meters of tubing, but 1) i can only buy in stock lengths of 6 meters, and 2) i have allowed some extra material for practice and cockups. So I guess in theory the ACTUAL cost of material consumed on the trike will be about £150 - that might have to be discussed in the fine detail of the finished project. But as it stands now, it could be argued that i only have £99 left to finish the project!
For those who are interested, I'm buying my tube from the very helpful Zina at Hub Le Bas in Bilston
So i think ive pretty well got all in order now to get on with making this thing...
1. 12 tonne hydraulic pipe bender off ebay for £65
2. brand new scriber and can of layout blue (do you know how difficult that stuff is to find?)
3. Welder sourced (but im not going to buy it until i return from holiday)
4. Redundancy just around the corner

Monday, July 07, 2008

To BK or NBK? - that is the question

Im about to buy my frame tube. Ive worked out the diameter i want and the length. Ive found a supplier of CDS tube (now called CFS and often called DOM by the Americans) - but theyve thrown an option into the can of worms. Do I want it BK (as drawn - work hardened) or NBK (normalised - back to its cast condition which is a bit softer). NBK is by the way the spec for hydraulic pipe.
Well, what do I want? does it effect 1) bendability, 2) weldability, 3) vehicle strength and durability?

Wikipedia says......
"Normalizing: Carbon steel is heated to approximately 55 °C above Ac3 or Acm for 1 hour; this assures the steel completely transforms to austenite. The steel is then air cooled, which is a cooling rate of approximately 38 °C (100 °F) per minute. This results in a fine pearlitic structure, and a more uniform structure. Normalized steel has a higher strength than annealed steel; it has a relatively high strength and ductility"

Already referenced elsewhere in this blog; Miller Welds ( http://www.millerwelds.com/education/articles/articles70.html ) says.....
"Drawn-over mandrel tubing is manufactured to ASTM Specification A513 Type 5, and frame fabricators often chose SAE Steel Grades 1018 and 1020. These have a yield strength of 70 ksi or 483 N/mm2"

Now i did metallurgy as part of my first degree, but i suspect i was sitting at the back designing jazz club ties with Hughie rather than listening to the lecture that talked about "yield strength" - and now my head is in a spin

Its amazing how many manfacturers of motorbikes claim that their machines are made of the "highest grade steel" - but none of them can quote what that actually is - buyer beware!

Sunday, July 06, 2008

Budget is getting tighter

last count = £679
Plus £18 for the box section metal for axle clamps...
= Current total; £697
that leaves me with just over 300 quid and i think my frame tube is going to consume half of that.
So what else am i going to need to spend money on?
- handle bars (im sure the ones ive got wont do)
- throttle twist-grip and cables
- brake pipes
- electrics
- battery
- rear lights
- prop shaft modifications
- and probably loads of other things i havent thought about
And in addition to all that, ill bet just the nuts and bolts that i will need to buy will be 50 quid!

THIS is living


I cant tell you how much i enjoyed my 4 hours in the garage today. Was it only 4 hours? it flew by... and yet it felt like all day.
Earlier in the week i bought myself a few feet of 50x50x3 and 50x100x3 box section (from my favourite steel stockist - FW Warden - www.fhwarden.co.uk they are great for offcuts) for my rear axle to frame clamp. It cost me £18 (a good 80 quid cheaper than the estimate for getting some clamps engineered for me)
My files also arrived during the week (i havent told the wife yet that they cost more than twice as much as the metal that im going to use them on! - however they should last me a long time beyond this project and anyway that cost comes out of another budget... somewhere)
And so today I made the time to get into the garage with some fresh metal (I get quite excited about having fresh metal rather than something hacked off some bit of scrap) and some sharp tools.
I sweated like a pig as i sawed and filed (I'm glad i didnt go for the 5mm) and the music was loud - it felt fantastic
So as you can see from the picture I have got one clamp block pretty well made up (i havent put the cut outs for the frame tubes in yet as im waiting for the material first) - the pipes in the picture are heating pipe insulation laggings
Im not sure yet about the full height of these blocks - i think im happy with the depth below the axle, but will reduce the height above it. I think this is going to create a very strong frame - and im loving it in this big tube size.

Monday, June 30, 2008

right tools for the right job

I'm getting close to committing big time to this project. Ive decided the tube diameter (45mm big and chunky) and found a supplier of CDS - though im still waiting for their quote. I know what welder im going to buy (yes im going to buy one! had an unexpected bonus recently and think i ought to spend it on some thing useful before the wife spends it on something utterly useless), and i know what pipe-bender i will get.
So all i need now is a couple of new hacksaw blades and a couple of decent hand files.... but WHAT files?
I know i could tell what files I want if i could hold them in my hand, but I dont know of any stores that stock a good range of files - even the draper store near me can only "get them in for you mate".
So I go to the online specialists and find that the choice is overwhelming and the im lost on all the technical specifications and terminology. Fortunately i know that the internet has the answer for me somewhere and of course Wiki deleivers the result.
If you are ever wondering what type of file to buy, read this first....
http://en.wikipedia.org/wiki/File_(tool)
and then when you are ready to buy your files, Buck and Hickman appear to have an extensive range
http://bhinone.farnell.com/jsp/search2/browse.jsp?N=401+1000147
And as i write this now a txt message pops up on my phone from TVOR reminding me not to forget to order good handles too!

Monday, June 23, 2008

Clamp blocks design


Ive been getting a bit stressed. Ive been getting a bit frustrated with people telling me how they would do it. I'm not proud of myself for this feeling - i spend most of my working days teaching people that they should be open minded to different ideas and approaches. However, I had these feelings of frustration and so I had to face up to them.
This rear-end attachment has created some debate. There are indeed, many ways I could skin this cat - and Ive become a bit attached to one specific idea. And its kinda hard to let go when suggestions are offered and I'm refusing to see how they can be any better. I have been of the mind to forget my tight budget and just go and get the clamp blocks engineered for me so i can focus on the frame (and not the component parts).
But I've taken some deep breaths and reflected on how my single-minded focus might be restricting my progress - and i think ive come up with a solution that should satisfy me on a number of levels;
1) the above solution is something that i can fabricate myself - thus saving me critical budget, AND fulfilling my "I-did-it-myself" requirement
2) it offers strength and integrity without compromising aesthetics or budget
3) I managed by the skin of my teeth to break away from my restrictive idea to find one that is better
As I say, I'm not proud of the fact that I got irritated by other ideas offered in good will - but i'm pleased that i recognised my poor behaviour and developed it. I shall try harder next time and I apologise here and now to anyone who i might have offended by not being interested enough in their suggestions (rest assured now that i have thought long and hard about all those comments and i think that you have all influenced the final outcome as seen in the sketch above)

So I shall make it out of box section (maybe 5mm is too thick - 3mm is probably quite good enough and the width is dependent on the diameter of the frame tubes) - i like this option because it will be relatively easy to make (i don't want to spend too much time making components for a project that is supposed to be a "conceptual" art piece - im a big-picture man, not a detail man). And I like the the way in this design that the clamping force between the two halves of the clamp blocks is through the faces of the box sections, and not onto the axle tube

I feel satisfied with the final design, guilty about getting irritated, and grateful for all the support and stimulation - please keep the ideas coming and remind me whenever I'm dismissive again

Wednesday, June 18, 2008

Thinking about my rear end


So how am i going to fix the frame to the rear axle? This is an important question on a number of levels.... Not least the fact that it is critical to the safety and handling.... but almost as important in as much that so many trike builders seem to make such a pigs ear of their project at this point.
Clearly the easiest approach would be to use the existing mountings on the axle itself (leaf spring mounts and shock-absorber mounts). Im not convinced however that this is the most beautiful solution - the spring mounts are too far outboard for me - i really want to keep the rear end clean and spindley and to do this i need to keep the frame as close to the centerline as i dare go while ensuring i keep an adequate degree of rigidity in the construction. Once again the position that Reliant gifted me with for the shock-absorber mounts aren't ideal (in my eyes).
Kev at projex uses the method shown in the top of the attached sketch - and i must say i rather like this - it would allow me to create a torsional rigidity (to handle all that power that a reliant engine drives through that performance differential) and keep the lines of the frame neat and tidy. This solution would mean that i would need to pay someone to do some engineering for me to make the clamp blocks.
Hughie, always looking out for my budget, wondered if i might be able to fabricate my own (and avoid the engineering costs) clamp blocks - similar to the idea in the lower part of the sketch (perhaps out of fabricated flat, tube and/or box sections). My concern here is that i dont want to be spending my time fabricating components when i should be fabricating the frame itself. I am sure there are other ways of executing this, and i shall postup some other sketches shortly

Tuesday, June 17, 2008

Now i feel like a proper trike builder


I am surprised at just how excited I was to receive an inch thick file of official regulations and procedures. Normally I would file detailed paperwork where it belongs (with the missis) But this manual is rather special.
For 30 quid (and that doesnt come out of my build budget) and a number of protracted telephone conversations with some very nice, but a little confused Welsh people in Swansea, I bought myself the VOSA (Vehicle & Operator Services Agency) MSVA (Motorcycle Single Vehicle Approval) inspection manual.
This is going to have to be my bible to which i will have to navigate around to find the loopholes that will allow me to create the Trike that i like.
Im a little concerned about chapter 8 - "External projections - unbodied vehicles".... Reasons for failure, point 8. "Any protruding part pointing outwards, that is, a) pointed, b) sharp and are likely to increase the risk or seriousness of body lesions suffered by any person struck or grazed by the vehicle in the event of an accident"..... so where does that leave an open and exposed car engine??

Sunday, June 15, 2008

clearing the log jam in my head


I sometimes get a bit mind locked when im working on exciting projects - i see a challenge, explore various solutions and then from those solutions make a choice about a plan of action. All very well, but only if you've explored ALL the solutions. If you've only got half a dozen mediocre solutions to choose from, you could find yourself implementing a bit of a soggy idea.
So it is with great thanks to TVOR and Hughie that I felt rather satisfied with my efforts today.
TVORs thoughts in an earlier posting about using the existing forks as a way of jigging the headstock is of course the genius way to do this. You can see from the photo, that its quite a simple job done like this.
And Hughie came over on his Harley to see how progress was going. We spent a jolly good time in the garage with various lengths of pipe insulation exploring the ways in which the frame could lay out. Once again i was especially stuck on the bit of frame that will go round and over the back of the engine - which in hindsight seems trivial, but i simply couldnt see any alternative to my mediocre solution - until Hughie said with a bit of bent foam pipe in hand "well why dont you do this?" - no point describing the idea here, its not particularly interesting to the reader, but for me it was another moment of clearing the log jam in my head.
We also explored the petrol tank - i havent been very happy with the look and feel of the petrol tank that ive got - it just doesn't fit sweetly with my vision... and so petrol tank ideas are starting to develop - more on that later.
All in all, im getting close to having to commit to buying some frame tubing (which by the way, both Hughie and I are agreeing on as looking rather nice in a phat I.D.) - just got to decide on the method of tieing the frame to the rear axle - but thats a whole new blog post

Sunday, June 08, 2008

Budget update

£609 (as of last count) + £70 (headstock turning and bearings) = £679
Crikey, I'm a bit worried that im going to go over budget - can i really bring this all together now for just over 300 quid? and i haven't even bought my frame tubing yet!

A Jig for the Jig


So now that ive got the headstock, ive got to work out where to put it!
I'd forgotten just how heavy the front end was and its quite difficult to hold everything in place so that you can get a feel for the look and ride position (I ignored all wheel geometry theory - I was just looking for the look). A couple of lengths of rope and a few g-clamps helped me out while I created an MDF template that I will be able to use eventually to position the headstock at the correct height and angle.
So all I need to do now is fabricate a jig to hold the headstock tube firmly in place and keep it square and true to the centerline and perpendicular while i shape and weld the frame tubes to it. Professional frame builders use a very simple pair of steel cones that clamp down on the headstock tube ensuring it remains on center axis.... im wondering what i can improvise to create a similar set up. something like a pair of cones or balls with a length of All-thread up the middle that i can tighten together - need to keep my eyes peeled

Nice bit of turning


Kev at Projex came up with the goods - a lovely shiney new headstock.
I left work early to dash over and collect it for the weekend. Kev was just shutting up shop to set off to a bike show and present his sponsor trophy for best in show - he'd made a little billet machined forks and yoke trophy mounted on a granite plinth - ive got my eyes on that prize for next year.
Before he had to get away, I managed to get some thoughts out of him on 1)prop shaft modification, and 2) rear axle mounting
1) Kev reckons - as the prop shaft will be so short it wont need balancing - he reckons i could do it myself! He makes his own but didnt seem interested in doing me one. He reckons a quick chop, sleeve and weld - and some longitudinal slots cut through and welded in to get a good sheer resistant join
2) Kev reckons - dont use any of the original mounting points on the rear axle - grind those off - and use a split block clamp - I'll put some sketches up on line soon - i quite like the idea here as it would look much more pretty and not constrain me to using mounting points that dont fit with where i want the frame to be

So I payed my £70. 50 quid for the turning, and 20 quid for 2 new bearings, and left Kev feeling like im now a real motor bike builder

Monday, June 02, 2008

dontcha just love the internet?

Im starting to think about the equipment im going to need to build the frame - principly a pipe bender and a welder
But what welder to get? a couple of hours on the internet has some answers.....
http://www.mechwerks.com/Welding.htm - suggests 210A
http://www.millerwelds.com/education/articles/articles70.html - suggests 250A
and if you need a tutorial on how to do it?....
http://www.youtube.com/watch?v=ZF3ZWAAu_jI&feature=related

why i can even learn how NOT to make a frame!
http://www.youtube.com/watch?v=W6hUMeZXKJM&feature=user

As for pipe, ive been learning that i should be thinking about something like 30mm O.D, 3mm wall thickness (though i wonder if 30mm might look a bit too skinny)

Theres some interesting stuff on pipe on this site (including a bend allowance calculator)
http://www.rorty-design.com/content/tube_work.htm
and check out their section on "poultry-poo" welding
So i go to bed a little more informed

Friday, May 30, 2008

Engineering

I was impressed recently when i saw the fabulous outcomes of my brothers blood, sweat and tears in the renovation of his Grade II listed thatched cottage. He has a fabulous streak of Nike in him. It inspired me, and so I've decided to "Just do it"....... But where to start?
I need to get the headstock turned and so hit the internet, Back Street Heroes mags, and contact recommendations of Hughie to find a suitable engineering company to make my bit.
There are hundreds of small engineering companies here in the West Mindlands (though sad to say they are reducing in numbers these days) - but i dont really know what im asking for (Ive never had a headstock requirement before) so i really wanted a MOTORCYCLE engineering workshop, and i wanted one that i could go visit to talk through my requirements - so i wanted a custom bike builder in Birmingham. [and while we're on the subject, my definition of a custom bike builder doesnt include boutiques that buy and sell chromed harley parts and airbrushed helmets]
Up until now I had planned to use Ray at BlackSpur [see earlier blog entry], but sadly that business appears to be no more (another example of small specialist back street engineering companies being pushed out by housing developments) and so a new search was necessary
My searches found a couple of people who over the phone showed little interest, a couple of people who i suspected were going to outsource the turning, and a couple of people that were simply going to be too far a drive to get to.
Exasperated, I glibly typed "headstock" into ebay, and bugger me, there was someone offering to turn a head stock to my requirements! fifty quid! But surely thats too dodgy to buy a bit of engineering from an unknown on an auction site? But wait!...... whats this? this chap is in the midlands, he has a website, he builds custom trikes and bikes, he is 6 miles from my house!
I call him. Kev is a nice guy. He is interested in my project. He invites me over.
And what a fab workshop it turns out to be. And what a skilled engineer - hes been in this business for 6 years. There are 4 bikes in progress, one trike and hanging from the roof, a ready for sale, complete soft rear trike end. His engineering facilities are clean, tidy and well lit. And he made time to chat. Brilliant :-)
For all your custom bike manufacturing needs talk to Kev at www.projex-uk.co.uk
The only downside is that "reliant engine" is a sinful concept in Kevs world, so as long as i can keep talking about trikes and not about engines, i think Kev is going to be a really useful chap on this project. All ive go to do now is to continue to "just do it"

Tuesday, May 27, 2008

Geometry

As i start to lay the 3 major components (rear axle, engine/gearbox, front-end headstock) out onto my jig, I'm starting to wonder about centerlines. Up until now i'd assumed that everything is symmetrical - that is, the differential is in the middle of the rear axle, and the crankshaft is in line with the prop-shaft.
On closer inspection it seems like they are pretty well all designed to be on line down the center line of the vehicle - but how would i know? Does the engine have an off-center center of gravity? is it shifted in the original Reliant Robin to give more leg clearance for the driver? Does the long prop-shaft accommodate this in a way that my soon to be shortened prop-shaft couldn't? and would an offset, off-weight engine have a significant effect on the handling of my trike?
So many questions, and so few absolute answers?
I return to my mission statement (i should have it laminated and hung on the wall really) - "to create a trike of beauty" - The fog lifts and all is clear.... mount the engine so it LOOKS right - which in this case is on centerline of crankshaft. It will mean that the radiator will have to be shoved over (to be back on centerline of the vehicle) so it wont be getting the most direct benefit of the fan, but i guess it will generally keep cool enough if i drive fast enough!

And then there is the rake angle of the front-end. If i lean it back as far as i would like, will it make the handling dangerous. Check out wiki to make your own decision - http://en.wikipedia.org/wiki/Bicycle_and_motorcycle_geometry

Thursday, May 15, 2008

building momentum


Ive been feeling frustrated (again) - having blown the dust off the black spanner, I was feeling like I would never have time to get back into the garage - there always seems to be too many other priorites - not least having to work to earn a living.
So what to do? well, clearly the only thing to do was go and work in the garage while I was supposed to be working for my employer! :-/ Actually, it was my boss who suggested it!
Could i use the time in the garage productively to think about stuff while i was tinkering?

Im not sure if i was very productive for my paymaster (though i do feel less stressed after 3 hours of metal bashing - and surely they will benefit from be being a bit more smiley) and i did write a few notes later in the afternoon on some clarity that came to me about a bit of work we are doing at the moment. Whatever, I think this is an experiment that requires some further research :-)

So Ive got the rear axle clamped square and true to the jig mounting frame. I enjoyed getting back to a bit of sawing, filing and welding. My welding is rubbish; im using a little 120A stick welder, and i was doing it outside in the rain. I comfort myself that my pigeon muck is plenty good enough for the time being for jig brackets - frame welding will require some new kit and lots of practice

Sunday, May 11, 2008

The Black Spanner is back


Its been over a year since the black spanner and I enjoyed each others company. In that time its been gathering dust and generally been getting in the way of other mini projects.
A year ago I was planning to make a jigging fixture that would hold all the necessary lumps in the right places while i welded a frame around them. And today I implemented my year old plan

As you can see from the photo, ive taken 2 lengths of 40mm kitchen worktop (i figured that these would be stable enough to hold everything pretty well steady) - joined them at one end to from a T - you can probably guess which end is forward and which is back. I ran a circular saw cut along the lengths before bolting them together and will use these as my centerline references.
Ive bolted underneath 4 heavy duty castors (courtesy of The voice of reason - trust him to have a set clean and available) so i can now move the project around a bit to get better access to it in my tiny garage.

There is nothing especially clever about what ive done here other than the fact that ive actually done something! and boy that made me feel so good. I am so looking forward to making the black spanner a priority again :-)